1.3 hrs
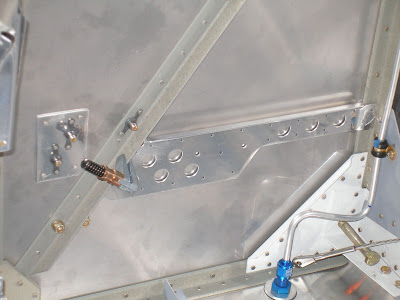
Drill gascolator bracket to firewall.
Prime bracket and doubler.
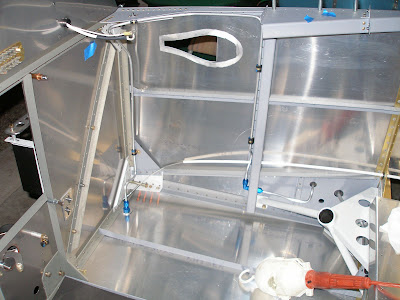
Drill pilot holes for roll bar.
Something is making me queasy about using aluminium rivets to attach the gascolator bracket to the firewall. I think I'm going to drill at least two of the holes for AN3 bolts. Then I have some steel holding the bracket on.

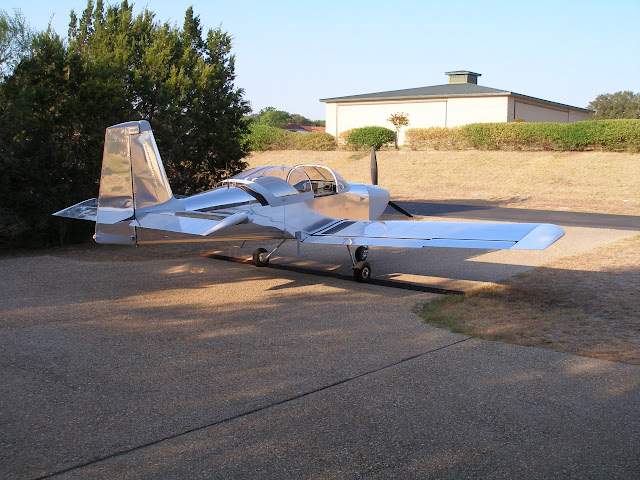
Van's RV-9A in Aurora
The Big Picture
Flying! 8/28/2011
Thursday, April 29, 2010
1.5 hrs, 4 rivets
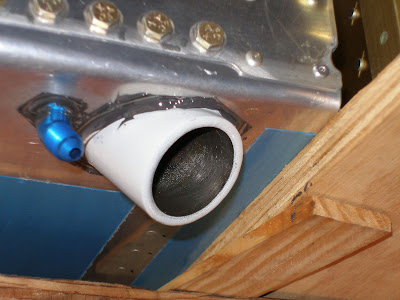
Fabbed the gascolator bracket. Did a little last night, but not enough to count. Got it cut to size, deburred, and cut the hole for the intake. Drilled the holes for the bracket bolts, and installed the nutplates. Now it needs to be drilled to the firewall.
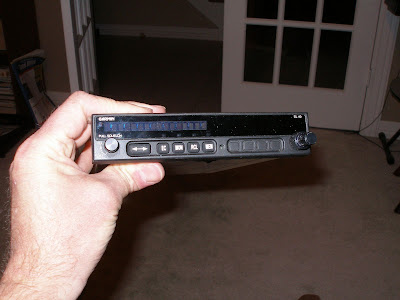
Got two deliveries today. The 327 tray from Garmin/AC Spruce, and the Nav/Stobe/Tail lights bought used. They had never been installed, so they are actually brand new. A NS90 pair, and a Suntail. Paid just what I wanted to for them. They're very bright, they'll give you spots if you look at them. I've been measuring current draw.
The left and right navs draw 202 mA each. The left/right strobes draw a max of 1.65 Amps each. I did see it spike to 2.25 once, but I couldn't repeat that. Multiple experiments with my meter came up with 1.65 as the max. They're drawing zero when off, and the long term average is 510 mA.
The Suntail Nav light only draws 90 mA. But the strobe peaks at 3.8 Amps! The strobe draws 42mA minimum, and 1.28 A average. This is all at 12V.
When I hold my hand held transceiver antenna close to the lights, it picks up noise, enough to break squelch. It picks up noise from the power leads that I have rigged up, also. I have to be about a foot away before the noise stops, closer and the noise gets stronger. Don't know how this will all perform when my nav and comm coax is running right next to the power leads in the wings. The nav antenna will be outside the metal skin, and about a foot away from the power leads.
Oh, yes. Almost forgot. Need to document a problem. Got a call from Garmin. They found what they think are problems with the SL-40. Something about the tray cam lock and damage to the display circuit board. There was also something wrong with the monitor button and a display segment. Unfortunately, this all kicks in their $450 flat rate repair charge. Ah, the perils of buying used. I can't wait to find out if the 327 has any problems. At any rate, the seller is trying to help make it all better. I'll pay more than I wanted to, but less than full price. On the bright side, the radio should be nearly brand new now. I tried to claim that the SL-30 function was defective and they should fix that for the flat rate. But the technician didn't seem to grasp that I was trying to be a smart ass. Is this mic on?
Fabbed the gascolator bracket. Did a little last night, but not enough to count. Got it cut to size, deburred, and cut the hole for the intake. Drilled the holes for the bracket bolts, and installed the nutplates. Now it needs to be drilled to the firewall.
Got two deliveries today. The 327 tray from Garmin/AC Spruce, and the Nav/Stobe/Tail lights bought used. They had never been installed, so they are actually brand new. A NS90 pair, and a Suntail. Paid just what I wanted to for them. They're very bright, they'll give you spots if you look at them. I've been measuring current draw.
The left and right navs draw 202 mA each. The left/right strobes draw a max of 1.65 Amps each. I did see it spike to 2.25 once, but I couldn't repeat that. Multiple experiments with my meter came up with 1.65 as the max. They're drawing zero when off, and the long term average is 510 mA.
The Suntail Nav light only draws 90 mA. But the strobe peaks at 3.8 Amps! The strobe draws 42mA minimum, and 1.28 A average. This is all at 12V.
When I hold my hand held transceiver antenna close to the lights, it picks up noise, enough to break squelch. It picks up noise from the power leads that I have rigged up, also. I have to be about a foot away before the noise stops, closer and the noise gets stronger. Don't know how this will all perform when my nav and comm coax is running right next to the power leads in the wings. The nav antenna will be outside the metal skin, and about a foot away from the power leads.
Oh, yes. Almost forgot. Need to document a problem. Got a call from Garmin. They found what they think are problems with the SL-40. Something about the tray cam lock and damage to the display circuit board. There was also something wrong with the monitor button and a display segment. Unfortunately, this all kicks in their $450 flat rate repair charge. Ah, the perils of buying used. I can't wait to find out if the 327 has any problems. At any rate, the seller is trying to help make it all better. I'll pay more than I wanted to, but less than full price. On the bright side, the radio should be nearly brand new now. I tried to claim that the SL-30 function was defective and they should fix that for the flat rate. But the technician didn't seem to grasp that I was trying to be a smart ass. Is this mic on?
Sunday, April 25, 2010
2.5 hrs
Assembled the nose wheel and the fork assembly. I'm using the aftermarket Grove magnesium wheel. It takes a very slight deviation from the standard build, except for the axle torque procedure which is different. But I havent't torqued it all to final specs. That'll wait until I install the gear.
Layed out the pilot holes for mounting the forward canopy frame.


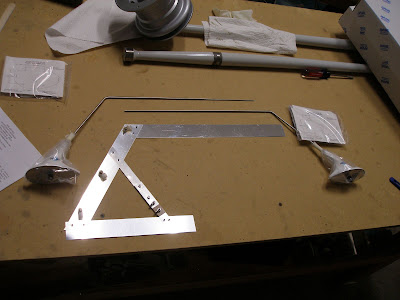
Used this gauge to see how close the bolts would be to the longeron.
Saturday, April 24, 2010
Friday, April 23, 2010
1.6 hrs
Drill gascolator doubler to firewall.
Deburr. Dimple firewall.
Cut throughhole for fuel line.
Need to countersink and prime the doubler, then that's all ready.
Then the gascolator mount will be in the critical path.
Received an order today from MPJA. The led indicators I will use were in the order. I think they'll work out just right. I'm using the 10 mm square indicators. I tried them out, and they're perfect for the application.
I'll have red for the oil pressure switch, yellow for the B&C voltage monitor, green for aux fuel pump, and blue for the heated pitot.
Thursday, April 22, 2010
1.5 hrs
The latest Van's order was on the front porch when I got home. Just in time. I was running into critical path items. In the package was an assortment of FWF parts, mostly AN fittings, the Van's Hobbs oil pressure switch, VA-128 restrictors, etc. And the all important gascolator doubler.
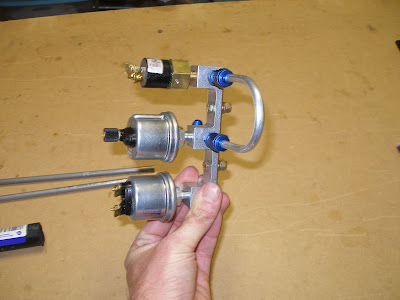
Started setting up the pressure transducer manifold. I'll have the Dynon fuel and oil pressure senders, but borrowing a great idea from Wayne, I am adding the Van's Hobbs oil pressure switch. This gives me a redundant indicator for oil pressure. It will be hooked up to a red LED. It could be used to verify oil pressure at engine start, but a very useful side benefit will be to remind me that the master switch is on after shutdown!
Deburred the gascolator doubler. I've been fretting over how to mount the Andair gascolator, but I think I have it figured out. Unfortunately, I need a chunk of 2 1/2 x 2 1/2 AA6 .125 angle. Sounds like another Van's order!
The latest Van's order was on the front porch when I got home. Just in time. I was running into critical path items. In the package was an assortment of FWF parts, mostly AN fittings, the Van's Hobbs oil pressure switch, VA-128 restrictors, etc. And the all important gascolator doubler.
Started setting up the pressure transducer manifold. I'll have the Dynon fuel and oil pressure senders, but borrowing a great idea from Wayne, I am adding the Van's Hobbs oil pressure switch. This gives me a redundant indicator for oil pressure. It will be hooked up to a red LED. It could be used to verify oil pressure at engine start, but a very useful side benefit will be to remind me that the master switch is on after shutdown!
Deburred the gascolator doubler. I've been fretting over how to mount the Andair gascolator, but I think I have it figured out. Unfortunately, I need a chunk of 2 1/2 x 2 1/2 AA6 .125 angle. Sounds like another Van's order!
Wednesday, April 21, 2010
1.6 hrs, 34 rivets
Rivet forward decks to longerons. Can't get two of the rivets, need a better bucking bar.
Also riveted ADAHRS brackets to the aft longerons. Trimmed them a bit, to allow easier access to the skin/longeron rivets when the time comes.
Shipped the SL-40 off to have Garmin/Apollo apply SB0921.
Tuesday April 20
1.9 hrs
Finish installing vent lines and brake lines in forward cabin.
Install NPT fittings to Dynon ADAHRS. Route AOA, pitot, and static lines to ADAHRS.
Sunday, April 18, 2010
4.8 hrs, 10 rivets
Started in on final forward cabin installation work. Installing all the brake plumbing that had been temporarily fit. It could have been done long ago, but I'm glad I waited. The vent lines will be in the way when riveting the canopy deck and upper skin, but it can be gently bent out of the way.
Primed the parking brake bracket and riveted it to the firewall. Four of the rivets don't really count, since they were just holes in the firewall from the first iteration of the parking brake.
Install fuel vent and brake line external fittings, seal with proseal.
Fit brake lines to parking brake. Install and torque.
Start fitting fuel vent internal lines. Torqued left side.
Saturday, April 17, 2010
5 hrs, 12 rivets
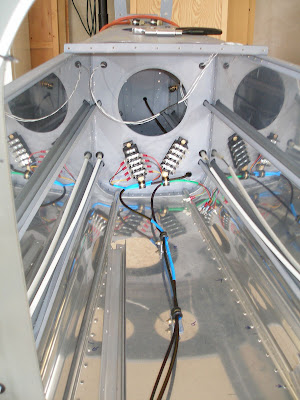
Finished up wiring for the aft fuselage. The next step is to install the ADAHRS and rivet the aft top skins. But before that, I have to run all the pneumatic lines, and the Dynon network cable. But before that, I have to get the foward cabin finished up.
So the forward upper deck came apart for the last time. Primed the rib flanges that will adjoin exterior skins. And now it's time to finish all of the plumbing and FWF tasks.
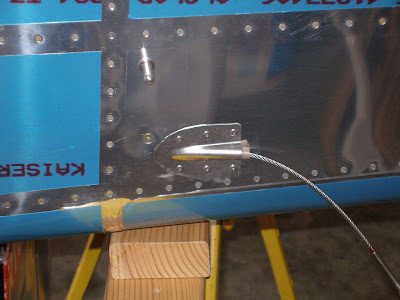
As I was taking the forward canopy deck apart, the post man walked up and handed me a box. In it was the Avery order for more green pitot line, and the trim covers for the rudder cable exit. So I finished up the rudder cable installation in the aft fuselage. I think it looks pretty good.
I've been floundering around lately, with too many different things to work on. But just like that, the path forward is now clear. First order of business is a order to Van's for more FWF parts.
Finished up wiring for the aft fuselage. The next step is to install the ADAHRS and rivet the aft top skins. But before that, I have to run all the pneumatic lines, and the Dynon network cable. But before that, I have to get the foward cabin finished up.
So the forward upper deck came apart for the last time. Primed the rib flanges that will adjoin exterior skins. And now it's time to finish all of the plumbing and FWF tasks.
As I was taking the forward canopy deck apart, the post man walked up and handed me a box. In it was the Avery order for more green pitot line, and the trim covers for the rudder cable exit. So I finished up the rudder cable installation in the aft fuselage. I think it looks pretty good.
I've been floundering around lately, with too many different things to work on. But just like that, the path forward is now clear. First order of business is a order to Van's for more FWF parts.
Thursday, April 15, 2010
Wednesday, April 14, 2010
1.6 hrs, 4 rivets
Drill holes and install nutplates for RAC trim servo.
Install terminal blocks for trim circuits.
Slowly working to finish all the critical path items to closing up the aft fuselage.

Looks like I just won the bids on a SL-40 and on the rest of the Nav/Strobe AeroLED parts I need. A bit of a discount over new. I've been looking for a radio for about 3 months. I've seen lower prices, but you have to factor in the tray and installation bits.
The market for these parts is hot right now. Anything good is gone pretty quick. Can't afford to spend too much time thinking about it, or you'll be paying AC Spruce for new equipment.
Soon I need to get a Garmin 240 Audio Panel. That will leave just the 430W to go. And the SkyView panels.
Drill holes and install nutplates for RAC trim servo.
Install terminal blocks for trim circuits.
Slowly working to finish all the critical path items to closing up the aft fuselage.
Looks like I just won the bids on a SL-40 and on the rest of the Nav/Strobe AeroLED parts I need. A bit of a discount over new. I've been looking for a radio for about 3 months. I've seen lower prices, but you have to factor in the tray and installation bits.
The market for these parts is hot right now. Anything good is gone pretty quick. Can't afford to spend too much time thinking about it, or you'll be paying AC Spruce for new equipment.
Soon I need to get a Garmin 240 Audio Panel. That will leave just the 430W to go. And the SkyView panels.
Sunday, April 11, 2010
3.5 hrs, 20 rivets
Ran the Cap 10k this morning. 47 minutes. Not bad for an old guy that can't run.
Built both main gear wheels. Torqued them to the 90 inch-pounds specified by Cleveland. May end up redoing the wheel pant bracket spacers, which means taking most of the mains apart again.

Katrin helped rivet the aft fuselage wire tie down cleats. One critical path item out of the way.
Then started in on some wiring tasks again. Redoing things that I did once or twice already.
Ran the Cap 10k this morning. 47 minutes. Not bad for an old guy that can't run.
Built both main gear wheels. Torqued them to the 90 inch-pounds specified by Cleveland. May end up redoing the wheel pant bracket spacers, which means taking most of the mains apart again.
Katrin helped rivet the aft fuselage wire tie down cleats. One critical path item out of the way.
Then started in on some wiring tasks again. Redoing things that I did once or twice already.
Saturday, April 10, 2010
1.3 hrs
Finally, something I've done before. The main wheels came packed with grease already. But I cleaned it out with laquer thinner/mineral spirits and repacked with Aeroshell #5. I hope I did as good a job as the factory did!
Went zip-lining today. It was fun! I've driven by this place a few times, and I had no idea such a beautiful hidden creek was mere feet away from the road. Central Texas is full of hidden gems like this. Now this one has been discovered and turned into a eco-tourism spot. That is better than those damned developers scraping it bare and putting up houses.
Friday, April 9, 2010
Thursday, April 8, 2010
1 hr
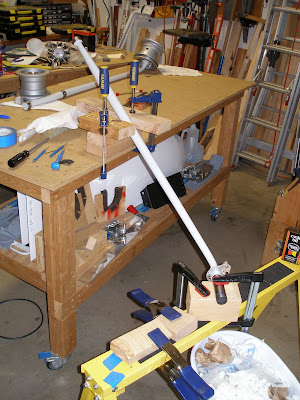
Drilled the cotter pin holes on the right main axle. There's two tricky parts to this: knowing when the axle nut is properly tightened, and creatively clamping the gear leg in place to drill the holes after they're marked. I hope the first part is right, but as long as the wheel is all the way on, then a good solid hand tight should be OK. I used a crescent wrench to tighten the nut down to make sure the wheel was on properly. Then loosed it up and hand tightened.
Didn't take any pictures, but there's another wheel to do.
Also primed my aft fuselage clamp points. They're ready to rivet now.
Wednesday, April 7, 2010
1.5 hrs
Installed the rudder cables. It took so long because I installed a nylon sleeve on the cable first. Wayne has this on his, and if it's not working out, I'll take it off.
It's much easier to push the cable end through the snap bushings if you remove the bushing from the bulkhead. But not impossible. Which is good if you've sealed up the baggage compartment side covers.
Got my second Bob Archer wingtip Nav antenna and the two RA Miller bent whip Comm antennaes from Cheif. They had been back ordered. Now they'll sit for a little while I work on other items.
Monday, April 5, 2010
Sunday, April 4, 2010
5.5 hrs, 7 rivets
Finished running the big wires. The 6 gauge wire looks like complete overkill. I may end up replacing it with 8 gauge. Especially compared to the 14g that carries the E Buss loads. I might want that to be 12 gauge.

But I am happy with how the routing is working and the mechanics of the fuse tray.

Finished running the big wires. The 6 gauge wire looks like complete overkill. I may end up replacing it with 8 gauge. Especially compared to the 14g that carries the E Buss loads. I might want that to be 12 gauge.
But I am happy with how the routing is working and the mechanics of the fuse tray.
Saturday, April 3, 2010
6 hrs, 6 rivets
Cut wire routing holes in canopy deck ribs.
Cut holes for scat tube pass through.
Drill for adel clamp attach points.
Drill for EMS pod and ammeter shunt.
Refine panel layout and avionics cutout in subpanel.
Start routing main buss feed.
Went to home depot to find brass hardware. Found #10-32, which will work OK.
Friday, April 2, 2010
6 hrs, 8 rivets
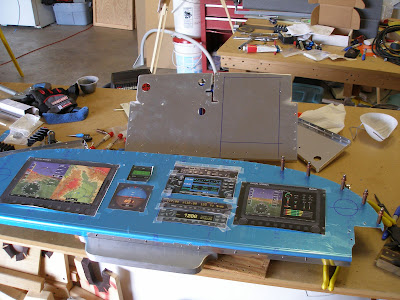
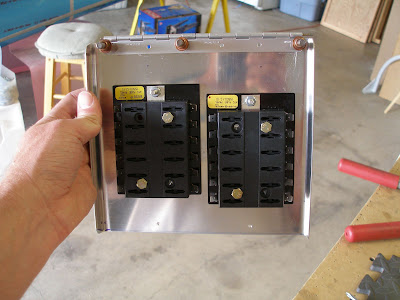
Finally installed the fuse tray. Match drilled the hinge and fabbed a bracket for the two dzus fasteners. The attach bracet has a Z shape, so the forward edge of the fuse tray is higher than the bottom of the panel. This keeps the wing nut dzus fasteners out of the right seaters space.
Fit and drilled the engine control bracket. Spent part of the 6 hrs trying the plane on (sitting it it). The standard location for the bracket intrudes on space needed by my knees. Also, if this fabbed bracket is installed flush with the forward face of the firewall, the control cables will be about an inch too short. So I fabbed a bracket to mount it behind the panel, and moved it an inch to the right. My right knee is very satisfied with the result.
Install nutplates on the control bracket so it can be removed from the firewall.
Installed fuse blocks on fuse tray. Then looked at where to put the dzuz fasteners. One problem I've had is the subpanel is a bit warped. Fluting hasn't helped. So I clamped a piece of wood to the back to straighten it up. This made the fuse tray fit much better and I drilled pilot holes in the tray and bracket. I'm thinking I might rivet a angle along the bottom of the subpanel to straighten it out. Need to get the avionics stack sorted out to see how that will work.
Drilled VA168 transducer manifold to firewall.
Some of the time was spent planning firewall penetrations for all of the electrical stuff. I think I'm converging on a solution.
Thursday, April 1, 2010
.4 hrs
Two packages arrived today. The SteinAir order, with wire, terminal blocks, and the cabin lighting products. And the AC Spruce order - the PC680 battery, stainless AN3 hardware, Adel clamps, a few bits a wire I forgot to order from Stein.

Discovered that the "stainless" hardware affects my compass. So can't use it to mount the ADAHRS as I was planning. I guess I'll make a trip to Home and Aircraft Depot to get some brass hardware.
The .4 hrs is charged against installing a protection diode on the starter contactor. Also applied some heat shrink to the master contactor diode
Two packages arrived today. The SteinAir order, with wire, terminal blocks, and the cabin lighting products. And the AC Spruce order - the PC680 battery, stainless AN3 hardware, Adel clamps, a few bits a wire I forgot to order from Stein.
Discovered that the "stainless" hardware affects my compass. So can't use it to mount the ADAHRS as I was planning. I guess I'll make a trip to Home and Aircraft Depot to get some brass hardware.
The .4 hrs is charged against installing a protection diode on the starter contactor. Also applied some heat shrink to the master contactor diode
Subscribe to:
Posts (Atom)
