2.2 hrs
Marked the stringers for match drilling. I think the instructions are a bit off here. They say to mark a centerline 3/8'" from the unbent edge. The problem is that's nowhere close to the centerline. After inserting into the channel, it became impossible to get that line matched up in the predrilled holes in the skin. It's clear that the stringer only goes in one way, and has to be flush to the skin. I MEK'd off the first line, and remarked, this time about 9/32 from the edge. This was much closer. But in the end I reached over the top, felt for where the stringer goes through each rib, got it flush, and centered, and then drilled the hole. This may not have hit the line, but I'm confident it's the optimal place for the hole at that rib.
After this delay, finished match drilling the stringers to the left wing.

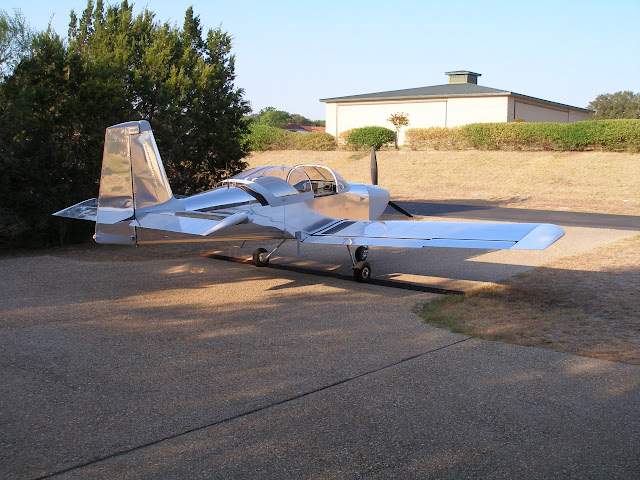
Van's RV-9A in Aurora
The Big Picture
Flying! 8/28/2011
Wednesday, October 29, 2008
Monday, October 27, 2008

Sunday, October 26, 2008
4 hrs misc, 4 hours construction
Worked all day on the project, finally forcing myself to stop at 10PM.
First, yet another trip to Home and Aircraft Depot to buy some carriage screws for the jacks.
Then completed the jacks for the wing stand.
Worked all day on the project, finally forcing myself to stop at 10PM.
First, yet another trip to Home and Aircraft Depot to buy some carriage screws for the jacks.
Then completed the jacks for the wing stand.

While the saw was setup, cut all the pieces for the wing cradle. Also setup the cross pieces that will be used to eliminate wing twist.

Finally, refined the leading edge cradle that the Gunnery Sergeant handed down to me. Yep, that's the same jig, you can recognize the paint. Mainly used the drum sander to smooth out the cuts, and then lined with felt strips cut from sheets bought at Michael's Aircraft Supply. The spray on 3M glue worked great for this application.

Used the new jacks to level the left wing frame.

Pulled the top skins. Predrilled the wing walk doubler. Started installing the top skins on the left spar. As I got the outboard skin on, I realized exactly what other builders were saying about the skin extending out beyond the spar. It's far enough that the wing support arm is in the way. I moved the spar about an inch further out, and now the skin clears. But I have to redo the twist clamps now.

Also set up the two plumb bobs to check for wing twist. The whole alignment process is very iterative. Get it roughly right. Set up the clamping mechanism. Do a rough check for twist.
Align the bottom spar horizontaly so the spars are exactly perpendicular. Rinse, lather, repeat.
Don't do this at 10 at night after working on it all day.
Saturday, October 25, 2008
4.3 hrs build, 2 hrs misc.
Friday disassembled the right wing frame.
Clecoed the left frame together and match drilled.
Today, Saturday, disassembled that and deburred all of the ribs and spars.
Went to Lowes and bought another pair of turnbuckles to add some safety to the wing stand. Then attached angles to the two outboard ribs for stand mounting. Mounted both spars in the wing stand, ready to start working with the skins.
Ran the LiveStrong Challenge 5K this morning. 21:49. Not bad for no real training.
Thursday, October 23, 2008


Wednesday, October 22, 2008
8 hrs.
A week since the last post, but did a lot of work in the meantime. Last week finished deburring the main ribs and started fluting. Got 4 fluted Friday morning before boarding a commercial flight for DCA. Visited Dad's vineyard in Rappahanock County, Virginia. Beautiful country. Like the Shire, but with rednecks instead of Hobbits. The rednecks are being gentrified out, since the land is being rapidly bought up by yuppies from the DC area.


Didn't work on the plane last night, watched the Texas game that was recorded. #1 Texas defeats Missouri 56-31. Oh, and Lake Travis won, 57-0
Today (Wednesday), finished fluting the main ribs. Arranged them according to installation order for both wings, and assigned their permanent positions. Cleaned off the gummy factory labels. If that's what the label is saying, all of the main ribs were manufactured between June 24 and July 10, 2008. Spent 2.5 hrs tonight, more than usual since I missed all weekend.
Also made the flap alignment jig. That went pretty fast.

Tomorrow, there will be something that starts to look like a wing in the garage!
A week since the last post, but did a lot of work in the meantime. Last week finished deburring the main ribs and started fluting. Got 4 fluted Friday morning before boarding a commercial flight for DCA. Visited Dad's vineyard in Rappahanock County, Virginia. Beautiful country. Like the Shire, but with rednecks instead of Hobbits. The rednecks are being gentrified out, since the land is being rapidly bought up by yuppies from the DC area.
Didn't work on the plane last night, watched the Texas game that was recorded. #1 Texas defeats Missouri 56-31. Oh, and Lake Travis won, 57-0
Today (Wednesday), finished fluting the main ribs. Arranged them according to installation order for both wings, and assigned their permanent positions. Cleaned off the gummy factory labels. If that's what the label is saying, all of the main ribs were manufactured between June 24 and July 10, 2008. Spent 2.5 hrs tonight, more than usual since I missed all weekend.
Also made the flap alignment jig. That went pretty fast.
Tomorrow, there will be something that starts to look like a wing in the garage!
Monday, October 13, 2008
1.2 hrs
Deburring main ribs. Finished the lightening holes on the main ribs and started on the flanges. Ate through 2 expensive scotchbrite wheels so far. That was using just the scothbrite wheel to deburr the inner holes. But I don't particularly like the results anyway. It takes just a little more time, and cleans up much better to use medium sandpaper, fine sandpaper, then the scotchbrite pads. Physically, the sandpaper is a lot more work.
Deburring main ribs. Finished the lightening holes on the main ribs and started on the flanges. Ate through 2 expensive scotchbrite wheels so far. That was using just the scothbrite wheel to deburr the inner holes. But I don't particularly like the results anyway. It takes just a little more time, and cleans up much better to use medium sandpaper, fine sandpaper, then the scotchbrite pads. Physically, the sandpaper is a lot more work.

But ordered more wheels, so those can be used for a final polish.
A small pile of ribs with flanges done, a large pile still to go. Then the tight spots need to be deburred.

Sunday, October 12, 2008
Rear spars done
4.0 hrs, 92 rivets
Riveted rear spars.
Riveted rear spars.


Pulled ribs, identified, and started deburring. Going in multiple passes, doing the lightening holes on all ribs first. Gonna need some more scotchbrite wheels!
Saturday, October 11, 2008
3.5 hrs.
Drilled left spar, deburred all drilled holes for both spars. Countersinking, and dimpling of the top flange above the root doublers. MEKd and primed both spars and their doublers.
Drilled left spar, deburred all drilled holes for both spars. Countersinking, and dimpling of the top flange above the root doublers. MEKd and primed both spars and their doublers.


Fred Magare visited today, to pick up the longeron angle I added to the wing order for him. He left me with all sorts of good parts, tank clecoes, tank attach Z brackets, a custom leading edge light design. It was good to meet Fred, and one of these days I'll need to visit him in way far south Austin.
Friday, October 10, 2008
.8 hrs
Managed to sneak in a little bit of deburring on the right rear spar before the football game. This is Texas, and on Friday night, we go to the high school football game. Even two years after the girl has graduated. In this case, we're watching history being made. The team was awesome, demolishing Lampassas 57-0 to go 6-0. The second unit even scored this game, but it was against Lampassas so it almost doesn't count. The history is being made by one each Garrett Gilbert, who threw 5 TD passes tonight to move up to 3rd on the Texas HS TD pass total list.
Managed to sneak in a little bit of deburring on the right rear spar before the football game. This is Texas, and on Friday night, we go to the high school football game. Even two years after the girl has graduated. In this case, we're watching history being made. The team was awesome, demolishing Lampassas 57-0 to go 6-0. The second unit even scored this game, but it was against Lampassas so it almost doesn't count. The history is being made by one each Garrett Gilbert, who threw 5 TD passes tonight to move up to 3rd on the Texas HS TD pass total list.
Thursday, October 9, 2008
1.1 hrs
Match drilled right rear spar.
Thought I had messed up the root doublers, but they are all #30's. There's a sentence in the narrative that makes it seem like some are #40's, but on closer reading, this sentence is talking about the spar flange. All the holes in the web are #30. There are some tricky countersinking details, but those are easy to contend with.
Had plenty of time, but I was so tired I had to call it quits after only an hour.
Tomorrow the Lake Travis Cavaliers will beat up on some hapless district fodder*, so no construction until the weekend. I have plans to number the plane N207LT, and will name it "Cav".
*That fodder turns out to be Lampassas. They're 0-5. It won't be pretty. LT has the #2 QB in the country. I lived in Lampassas county when I was in high school. But I went to Copperas Cove HS instead. When I went to CCHS, the Bulldogs won maybe 3 games in three years. Now they're the number five team in the country!
Wednesday, October 8, 2008
Monday, October 6, 2008
Sunday, October 5, 2008
4.3 hrs
Pulled and deburred most of the rear spar parts.
Pulled and deburred most of the rear spar parts.

Still need to deburr the rear spars themselves.
It takes me a long time to deburr these parts. I start with a rough file to knock off the die stamp marks, then go back over with a fine file to smooth out the deep cuts and bevel the edges. Next I use medium sandpaper, followed by fine. Last, a final polishing with the scotchbrite wheel. That's five passes over every edge. It hurts hands and back, and it's boring as hell.
It takes me a long time to deburr these parts. I start with a rough file to knock off the die stamp marks, then go back over with a fine file to smooth out the deep cuts and bevel the edges. Next I use medium sandpaper, followed by fine. Last, a final polishing with the scotchbrite wheel. That's five passes over every edge. It hurts hands and back, and it's boring as hell.

Saturday, October 4, 2008
Main spar prep finished
2.9 hrs, 235 rivets.
Completed riveting nutplates to the main spars. Also bolted the tie down bars and bell crank brackets to the spars. Not final torqued yet.
After finishing the spars, took some time out for shop maintenance. Set the wing jig up to hold both wings.
And in a major advance, cleaned out the south wall of the garage so that the skin crate can be stored there. Now we can get two cars in the garage again! Since the daughter has practically moved out, I guess that second car is the wife's.
Thursday, October 2, 2008
2.0 hrs, 77 rivets.
Finally got the spars spot primed. Used Alumiprep to clean the countersink cuts, then applied alodine. I started with a qtip, but ended up using a small bit of sponge to soak up the alodine and then dab the cuts. This allows quickly soaking every cut, going back over several times for a few minutes to keep fresh alodine on them. Worked like a charm. Did both spars in .9 hrs.
Used about a centimeter of alodine from the top of the quart bottle. The bottle should last for 2 or 3 more airplanes.
After the tie down bars, started on the spar platenuts. Got about half of one spar done before the hobbs hit 2hrs and time to stop. Only had to drill out one (because the rivet missed the platenut. Doh!).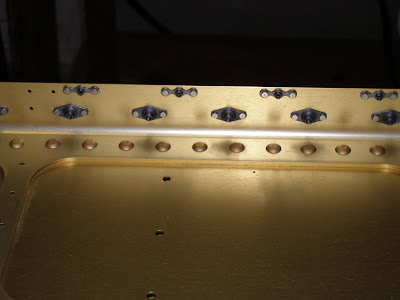
 Spar 9-1437-R, with platenuts installed.
It sure is nice to rivet after that long layoff. Real progress is riveting.
Finally got the spars spot primed. Used Alumiprep to clean the countersink cuts, then applied alodine. I started with a qtip, but ended up using a small bit of sponge to soak up the alodine and then dab the cuts. This allows quickly soaking every cut, going back over several times for a few minutes to keep fresh alodine on them. Worked like a charm. Did both spars in .9 hrs.
Used about a centimeter of alodine from the top of the quart bottle. The bottle should last for 2 or 3 more airplanes.
 After the alodine priming, the countersinks are almost the same color as the spar.
Took a break for dinner, and then the spars were dry and ready to go. But first, riveted platenuts to the tie down bars. It almost goes without saying, the squeezer was used for all of the rivets.
After the tie down bars, started on the spar platenuts. Got about half of one spar done before the hobbs hit 2hrs and time to stop. Only had to drill out one (because the rivet missed the platenut. Doh!).
Spar 9-1437-R, with platenuts installed.It sure is nice to rivet after that long layoff. Real progress is riveting.
Wednesday, October 1, 2008
1.8 hrs
Still no alodine applied to the spar. But did use MEK for a first pass of cleaning.
Countersunk the spar for center section and inboard tank attach bracket platenuts.
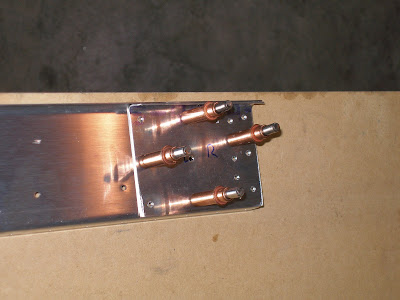
Drilled tie down brackets to spar.
Drilled tie down brackets nutplates and countersink the rivets on the aft side.
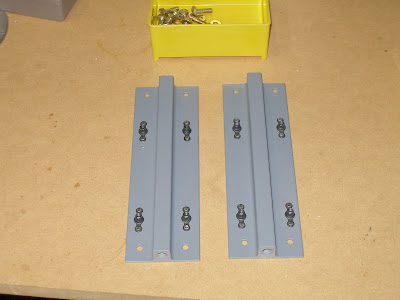
Cleaned and primed tie down brackets.
Still no alodine applied to the spar. But did use MEK for a first pass of cleaning.
Countersunk the spar for center section and inboard tank attach bracket platenuts.
Drilled tie down brackets to spar.
Drilled tie down brackets nutplates and countersink the rivets on the aft side.
Cleaned and primed tie down brackets.

Now all of the prep work is done. Alodine after work tomorrow.
Subscribe to:
Posts (Atom)
