Sunday
3.2 hours
Finished deburring stiffeners.
Debur outside of skins.
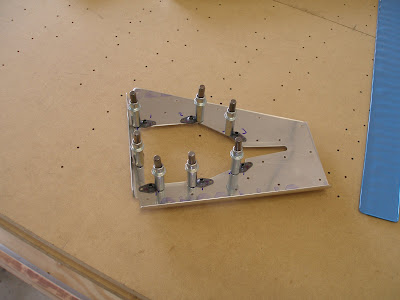
Match drill and debur counterweight assys.
Clecoed stiffeners into skin for match drilling the frame parts.

Van's RV-9A in Aurora
The Big Picture
Flying! 8/28/2011
Saturday, March 29, 2008
Finished match drilling left elevator stiffeners.
Started deburring stiffeners. Got about 2/3 done.

Match drilled, deburred and dimpled platenuts for the reinforcement plate.
Deburred and dimpled trim reinforcement plate using the #6 dimple die that arrived this morning from Avery.

Fluted 903/904 tip ribs. They needed a fair amount of work, including the end flanges. These were obvious when trying to fit the counterbalance skin. Without agressive fluting, the holes in the skin will not match the ribs. Clecoed the tip ribs together.
Cleco 913 counterbalance skin to tip ribs, both sides.

Thursday, March 27, 2008
2.0 hrs since last post
Thursday
.6
Finish match drilling bottom left including trim cover reinforcement plate.
Thursday
.6
Finish match drilling bottom left including trim cover reinforcement plate.

Start match drilling left top stiffeners.

Order from Avery's arrived, minus the longeron yoke. But discovered I still need a #6 dimple die. Sigh.
Wednesday
.7
Finished sanding, deburring stiffeners.
Started match drilling bottom left elevator/stiffeners.

Ordered a longeron yoke, 3/32 vice-grip dimpler, and a # drill gauge from Avery. Oh, and a Van's Air Force shirt!
Tuesday
.7
Finished match drilling right top stiffeners.
Resand long stiffeners for left elevator. The short ones didn't really need it. I must have done that right the first time around.
Monday, March 24, 2008
Sunday, March 23, 2008
Elevator progress
7.1 hours since last post.
Worked a little each night after work, except Friday. Friday night flew stop and goes at San Marcos for night currency. A perfect night. Smooth air, full moon. Coming back to Austin, did one stop and go on 17R, and then a right closed traffic for 17L. No traffic, I could take my time, and the controllers were relaxed.
Finished stripping plastic and deburring all parts. Started on match drilling for the bottom right elevator skin. But not happy with the deburring on the stiffeners. Had used the scotch brite wheel, but it can't do the whole job by itself. So resanded the 8 stiffeners, and then another scotch brite pass. Much better the second time.

 Trimmed the counterweights while the bandsaw was setup.


Worked a little each night after work, except Friday. Friday night flew stop and goes at San Marcos for night currency. A perfect night. Smooth air, full moon. Coming back to Austin, did one stop and go on 17R, and then a right closed traffic for 17L. No traffic, I could take my time, and the controllers were relaxed.
Finished stripping plastic and deburring all parts. Started on match drilling for the bottom right elevator skin. But not happy with the deburring on the stiffeners. Had used the scotch brite wheel, but it can't do the whole job by itself. So resanded the 8 stiffeners, and then another scotch brite pass. Much better the second time.

Right elevator stiffener match drilling underway.
Take two on the 921 gusset. This one's a keeper.
Trimmed the counterweights while the bandsaw was setup. Edge deburring on internal parts done for now.

Elevator skins look sharp when they're stripped.
Elevator skins look sharp when they're stripped.
Almost done with edge cleaning
Tuesday, March 18, 2008

Monday, March 17, 2008


Saturday, March 15, 2008
Finished rudder, started elevators
3.1 hours and 46 rivets.
Posts are getting sparse, as is the work. Finally finished the rudder on Friday. Riveted the trailing edge. It came out OK, within spec. Not perfect. One problem with the instructions is they keep saying to check and recheck the straightness of the trailing edge as you go. But they never say what to do if there's a problem. It worked out, but there's still the elevators to go.


Posts are getting sparse, as is the work. Finally finished the rudder on Friday. Riveted the trailing edge. It came out OK, within spec. Not perfect. One problem with the instructions is they keep saying to check and recheck the straightness of the trailing edge as you go. But they never say what to do if there's a problem. It worked out, but there's still the elevators to go.

Spent 2 hours Saturday goofing around with the rudder attach bolts, trying to mate the rudder to the VS. Got it done after a fashion, with only top and bottom bolts partly installed, but discovered that there's no way to completely get it right at this stage. Have to wait until the fuselage is ready to take the whole lot, because the VS spars get maniputated, i.e. bent, during the final installation process. When that's done, THEN the final tuning can be done. So the rudder is done for now. That took 39.5 hours.

Started the elevators by building braces to hold them open, and then trimming stiffeners to rough length. Destroyed a bandsaw blade trying to cut a very hard piece of steel to use as a rudder hinge bolt tool. In the end, a hacksaw blade did the job, but now I don't have the right bandsaw blade to cut stiffeners.
Sunday, March 9, 2008
3.3 hours, 25 pop rivets since last post.
Successfully reduced progress to a crawl. Felt miserable all week, so no progress after work during the week.
Saturday
Drilled out the 3 rivets set the previous night. Rerolled top and middle sections, using progressively smaller dowels until it was fitting right. Also used the hand seamer to crimp the outside skin over so that it would pull down tight during riveting. After about an hour of fussing, finally happy with the result. After the intial bend is done with two people, subsequent bending is easy enough to do with one person. Pop riveted leading edge.


On the the trailing edge.
Mixed up the proseal. At first, I tried to mix about a third of the proseal into baggie. This was an utter failure. Judging the amount needed to do the trailing edge, even the 3.5 oz cartridge from Van's is way more than needed. So I tried to use a smaller amount and save the rest for the elevators/trim tab. If you haven't messed with proseal, well you just have to see it for yourself. It's like the evil ooze from a science fiction movie. It's super viscous, super sticky, and super heavy. And it smells like a monkey cage.
I squeezed the base into the baggie, and then the hardener. And then tried to mix the two. That lasted about a minute before being abandoned. This stuff is so thick that the baggie and the mixing stick were basically glued togther instantly. Stirring more aggressively would definitely rip the baggie (and I used the super duty freezer bag). It's clear you want this stuff touching as few things as possible. So I just mixed up the rest of the batch in the cartridge and attached the nozzle. But then the next problem was pushing the ooze out of the cartridge. I used a short piece of scrap, but that was too hard and impossibly slow. So I screwed a 3x3 board on the end of the pusher scrap and braced that against my stomach and chest. This worked, but I have bruises. Lesson learned, just buy the cartridge gun.
After fighting with the proseal, finally applied to trailing edge, trailing edge wedge, and big dabs on each stiffener end for good luck. Wrestled the wedge into the trailing edge, and clecoed to the angle. The clecoes are not nearly strong enough to really press the proseal down. Then spent 30 minutes cleaning up the evil ooze. One builder had the trick of using scads of small bits of shop towel for cleanup. This is definitely the way to go. MEK also seems to clean it off when not yet dry.
Friday
Since Granger and Katrin were around, we rolled leading edge of rudder. Used a 1 1/4" closet rod as described earlier. Set 3 rivets in the top most section. But not happy with the results.

Sunday, March 2, 2008
1.5 hrs and 138 rivets
Finished riveting skins to the spar and bottom rib. Used blind rivets for the last one, even the thin nose yoke won't do the trick. Again used a trick from Smitty's page to get the four skin/rib/bracket rivets at the base of the root rib. Just used the 3" standard yoke and a small diameter 3/4" flush set, along with a 1/8" flush set on the moving set. With the small diameter sets, it was easy to tell if the squeezer was centered on the rivet.


Clecoed the nearly complete rudder to the angle that was match drilled yesterday. Looks like all the holes line up. Also built a roller jig for the leading edge. Basically just drilled a 3/8" hole at 90 degrees to each other into a long section of a closet rod. I knew I saved that for all these years for some reason! A screwdriver will fit nicely into the holes, and will provide good leverage for rolling the skins. As soon as help arrives, I'll roll the leading edge.
Finished riveting skins to the spar and bottom rib. Used blind rivets for the last one, even the thin nose yoke won't do the trick. Again used a trick from Smitty's page to get the four skin/rib/bracket rivets at the base of the root rib. Just used the 3" standard yoke and a small diameter 3/4" flush set, along with a 1/8" flush set on the moving set. With the small diameter sets, it was easy to tell if the squeezer was centered on the rivet.
Clecoed the nearly complete rudder to the angle that was match drilled yesterday. Looks like all the holes line up. Also built a roller jig for the leading edge. Basically just drilled a 3/8" hole at 90 degrees to each other into a long section of a closet rod. I knew I saved that for all these years for some reason! A screwdriver will fit nicely into the holes, and will provide good leverage for rolling the skins. As soon as help arrives, I'll roll the leading edge.
Saturday, March 1, 2008
2.6 hrs and 79 rivets
Riveted the counterbalance rib to the main spar.
Riveted the counterbalance skin to the rib.

Installed and torqued the counterbalance weight into the counter balance rib. Lynne helped with this. Had to use a C clamp to press the lead weight all the way in. It was hung up with the tight clearance after the rivets were set.

Then clecoed both skins to the frame.


Finished riveting counterbalance skin to spar and rudder skin.
Riveted tip rib into the assembly. Used blind rivets for the last hole on each side. This requires drilling out to 7/64.

After a break, discovered I forgot to put the bottom cap attach strips into the clecoed assembly. You might have noticed in the previous pictures. Fortunately, I had resisted the strong urge to set rivets in the bottom rib, so all that was needed was to remove all the clecoes and put the attach strips in. No loose parts left over after that!

After clecoing the trailing edge together, the rudder begins to assume its final form. It's looking very good.
Riveted the counterbalance rib to the main spar.
Riveted the counterbalance skin to the rib.
Installed and torqued the counterbalance weight into the counter balance rib. Lynne helped with this. Had to use a C clamp to press the lead weight all the way in. It was hung up with the tight clearance after the rivets were set.
Then clecoed both skins to the frame.
Finished riveting counterbalance skin to spar and rudder skin.
Riveted tip rib into the assembly. Used blind rivets for the last hole on each side. This requires drilling out to 7/64.
After a break, discovered I forgot to put the bottom cap attach strips into the clecoed assembly. You might have noticed in the previous pictures. Fortunately, I had resisted the strong urge to set rivets in the bottom rib, so all that was needed was to remove all the clecoes and put the attach strips in. No loose parts left over after that!
After clecoing the trailing edge together, the rudder begins to assume its final form. It's looking very good.
Subscribe to:
Posts (Atom)
