Van's RV-9A in Aurora

The Big Picture

The Big Picture
Flying! 8/28/2011

Wednesday, March 31, 2010

.4 hrs
Just a little quick work to say I worked on the plane. Trimmed the fuse tray corners a bit, and cut a hinge to fit.
Got a fancy new engine control bracket today. Ordered from Experimental Air. Did a trial fit based on comparing measurements with the original bracket and what the plans say.


Got off my lazy ass today and rode the bike. That and a 1 kilometer swim.

Tuesday, March 30, 2010

.5 hrs
Measured, cut, deburred, and bent the fuse tray. There's probably room on the ribs for the fuses, but having them swing down for access makes a lot of sense. I'll have two 12 circuit fuse blocks. One for the master, one for the E buss.

Monday, March 29, 2010

1.0 hrs
Trim bottom cowling attach strips for width of cowling.
Drill bulkhead through holes and install grommets for OAT probes. I might actually be done drilling holes back there.

Got the latest Van's order. .040 sheet for the fuse tray, various FWF parts. The most important part is the FWF docs. You need to have these about the time you're "finished" with the fuselage, before you put any holes in the firewall. I got lucky, everything I've done to date is OK.

Sunday, March 28, 2010

2 hrs
Drill terminal blocks for wing attach to seat area ribs.
Drill holes for OAT install. I'll post a picture tomorrow. My location requires a hole through the 710 bulkhead, but that's easy enough to do and provides a support point for the wires.
Trim and solder OAT leads to length.
Saturday, 3/27
6 hrs
Finish ADAHRS mount brackets.
Make cable mount brackets for aft fuselage and drill to bottom skin.
Install faston blocks for tail wiring. The 10 foot wire bundle I made for the aft nav/strobe light needs to be 11 ft. Doh!

Friday, March 26, 2010

1.4 hrs
Got a care package from UPS: the Dynon accessory order. ADAHRS, EMS module and the engine sensor kit. This will keep me busy for a while.


Started mounting the ADAHRS to the aft fuselage. The .063 angles had already been cut to length, so did a little fine tuning on the length and then got all the drilling done.


Need to order some non-ferrous #10 mounting hardware!

Thursday, March 25, 2010

1.1 hrs
Realized I needed to sand the roughness off the main axle threads. After that, the wheels slide on without too much coercion. Installed the axle nut and hand tightened.
Then worked on the right gear. Pressed the brake flange on, retorqued the brake flange assembly, an fit the main wheel. Did a trial fit of the brakes and the fairing bracket. Not a lot of clearance between that and the brake disc.
I'm going to wait to drill the axle for cotter pins until the weekend. Also need to get the wheel bearings cleaned and repacked.

Wednesday, March 24, 2010

1.4 hrs
Finished making the U408 spacers.

I went looking for pictures of the brake/wheel assembly process. Scott Card has a couple of pictures but none showing the detail I wanted to see. Maybe I'm dense, but these are not easy. Some of the parts require pressing.
Undid the bolt torqued down two days earlier and pressed the brake caliper bracket onto the U403 flange, at least for the left gear. It's not a slip on fit, but I was able to use the vise and some wood blocks to get it on easily enough. Had to drill the AN4 holes on U403 out to final size.


Then I was able to torque the flange on for good. (I think).


Tried fitting the wheel on, but met with failure on the first try. The bearings sure do fit tight.

Tuesday, March 23, 2010

1.1 hrs
Edge deburr all wheel fairing mount brackets.
Cut U408 spacers to length.

Monday, March 22, 2010

1 hr
Mounted the brake flanges to the main gear legs. It's fun to work on the finish kit!


Post Edit: Don't bother torquing these as I show. You'll soon be taking them apart.

Placed another Van's order for misc firewall forward bits. Got the airbox as part of the order.
Also some .040 sheet to make the fuse block tray.

Gonna need a Stein order for small parts, some wire, etc. I think I'll pickup some of the interior lighting parts now.

I think I have a good handle on the electrical system. The schematics aren't complete, but the buss loads are all planned out, at least good enough for now.


Sunday, March 21, 2010

4.2 hrs
Drilled the ground tab and 60A alternator slow fuse to the firewall. Fabbed a copper bus bar for the alternator fuse to starter contactor.


Drilled the engine mount to the firewall. Again, this simple sentence is a lot of work.


I found that the engine mount was just about right. Other builders have had to adjust it a little. As I said, the plans don't provide any detail for what seems like a really important task. You can see the trick I used here. After drilling the stock holes to 3/16, I put in a long AN3 bolt and wrapped in tape. I used enough tape to fit well inside a short piece of fuel line, which happens to fit just right in the engine mount sleeves.
The mount then hangs, presumably centered, from the top two bolts. Checking the bottom, they were almost exactly lined up. I then drilled and cleaned up the bottom two bolts, one at an time, taking the mount off and reinstalling with the newly drilled bolts. Then the tape and AN3 bolt came out of one of the upper corners, drill, deburr, reinstall, until all 4 corners are bolted in. Then I drilled the two bottom center holes. Deburr, add spacers as required, and voila, one engine mount. It'll come off again soon, but it looks like a real accomplishment.

Saturday, March 20, 2010

3 hrs, 15 rivets
Spent more time than that, but it was mostly research and pondering.
Finished securing the parking brake cable.
Decided to drill a new hole for the vent line adel clamps. And then installed the nutplates. For that.
Drilled pilot holes for engine mount. Seems like such an important part, but the instructions just about say, "Get it about so, and then drill the holes".

Spent a bunch of time looking at how various electrical gadgets will attach to the firewall. Zeroed in on a location for the B&C ground plates, and the 60A ANL current limiter.

Friday, March 19, 2010

5.0 hrs, 4 rivets
Fit, drill, deburr, countersink lower cowling attach strips. These are done until the cowling is fitted.

Fab new parking brake bracket. Used Wayne's design, it's already making me happy. It sits flush to the firewall, so the rudder pedal clearance problem is solved. The original design was based on Scott Card's documented design, but it just wasn't working when the rudder pedal assembly has to be all the way forward. Fitting into airplanes is one of the few times when being tall is a disadvantage.


Drill firewall, dimple, and attach nutplates.

Install parking brake cable. This simple sentence involved cutting the first hole in the instrument panel, the sub panel, and designing a brace for firmly attaching the parking brake cable and the VA118 brake lines to the firewall. Just a few more details on this and I can move on to the next puzzle.


Over the past couple of days a few care packages have arrived. From B&C, a ground tab setup, alternator OV/LV monitor, fusible link kits, and a 60 current limiter with mount.
From Cheif Aircraft, I got the 4 Lord J9613-40 engine isolation mounts, a Archer nav antenna, and a dual light dimmer. On back order are the other Archer nav antenna, and two Rami com bent whip antennas.

Wednesday, March 17, 2010

.8 hrs
Bend and cut material for the lower cowling attach strips. The bends worked out pretty well.

Monday, March 15, 2010

1 hr
Deburr and dimple leading edge of 7106. That part is done, it goes into storage.

Dimple top of firewall.
Deburr and dimple wing access covers. These worked out much better than the first pass.

Sunday, March 14, 2010

7.5 hrs, 17 rivets
Finished the battery and contactor mount installation.
Finish cutting, drilling, and countersinking side and top cowl attach strips.


Remove 7106. Deburr firewall holes.
Finish mounting battery box.
Countersink contactor doubler.
Install all nutplates.
Rivet doubler to firewall.
Trial fit of contactors.
Make copper bars for starter contactor.
Finish battery hold down bar.


Drilled all 6 wing access plates. I had drilled the first set wrong, all for #8 screws. But the leading row is #6 screws. The drilling is done, tomorrow deburr and countersink.

Saturday, March 13, 2010

6.6 hrs, 24 rivets
A good day of kit construction work.

Yesterday, spent the morning with the daughter designing and cutting material for a saddle rack. It's gonna be nice. Quality time with the girl (about to be 21!) is priceless.

In the afternoon, 3 misc. hours tearing down the finishing kit shipping crate. That's a lot of irritating work, almost (but not quite) worse than proseal.

For today:
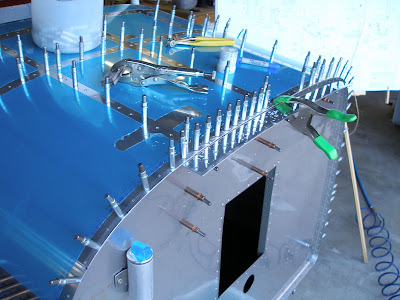
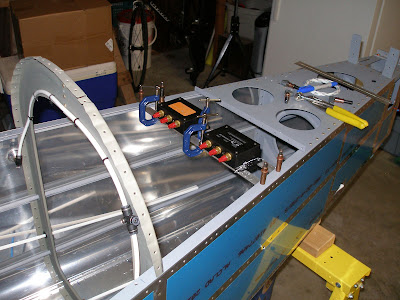
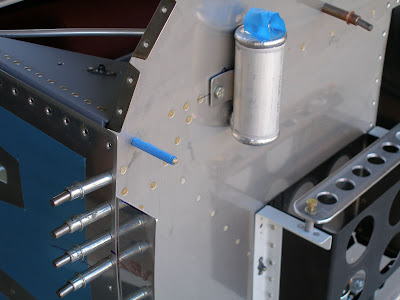
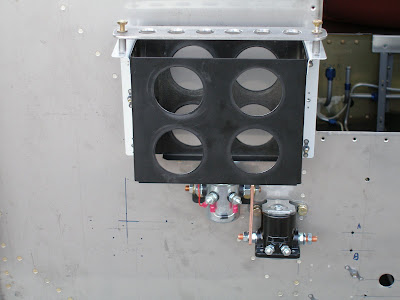
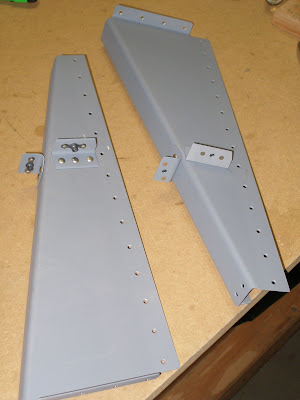
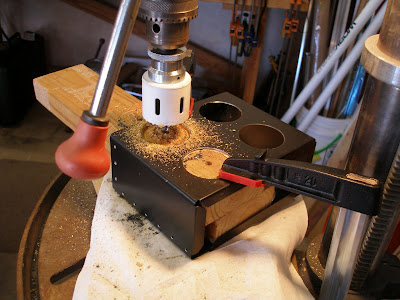
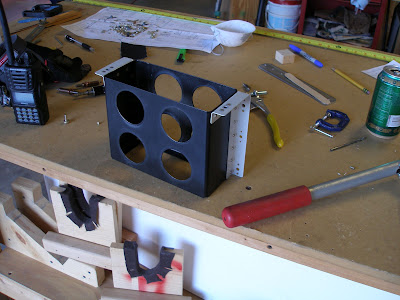
Fabricate battery box.
Match drill mounting brackets to box. Deburr, dimple.
Cut lightening holes in box. Deburr and prime.


Cut battery hold down bar to length and predrill holes.
Rivet mounting brackets to battery box.


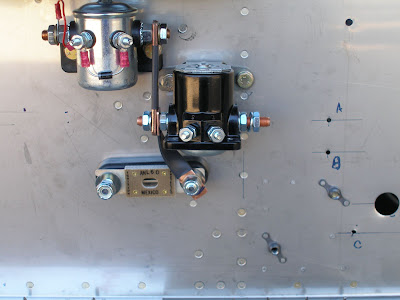
Drill out rivets on firewall for battery and contactor mounting.
Drill for battery box mounting platenuts, countersink brackets and prime.
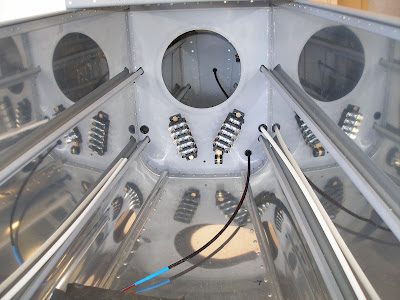
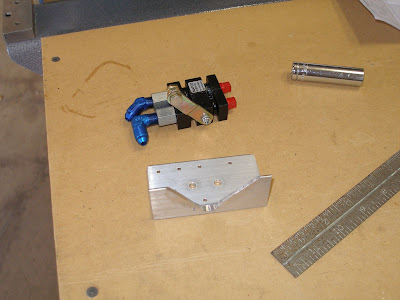
Fab contactor doubler plate.

Drill contactor doubler to firewall. About this time, I realized taking the 7106 forward top skin off would make life a lot easier for reaching inside to work on the aft side of the fueselage. But I wanted to get the cowling attach strips drilled first, to minimize how many more times the 7106 has to be clecoed in place. So that started a detour on the cowling strips.

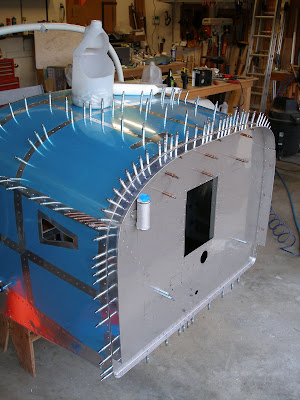
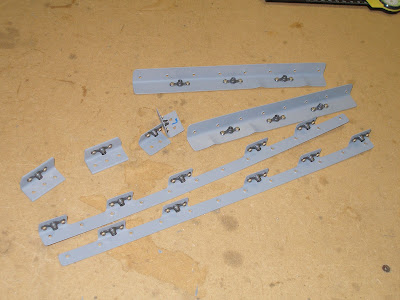
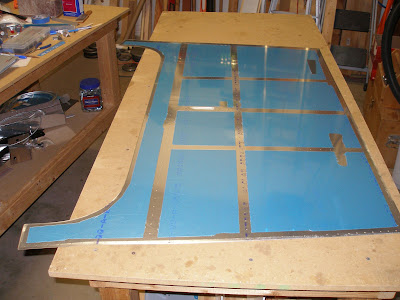
Cut cowling attach strips, edge deburr. I bought 2 square feet of .063 sheet. Van's shipped (and charged me for) 4 square feet, cut 1' x 2'. Glad I got the extra, it will be needed. I cut strips 2" x 24". This seems to be a good length, since only one of the strips is actually 24" long. The rest are shorter.

Start drilling cowling attach strips to firewall. It takes a few strips to realize the right way to do this. The strips have to conform to the curve of the skin in three dimensions. I figured it out after a while. Add to this the proper layout of the camlocks, and the rivet spacing. It makes a fun puzzle, but guarantees you'll get to remake some of the pieces, since your first try isn't up to standards. I figured out I can save most of what I did today, but will remake the left side and upper corners. The bottom is easier since there is no compound curvature.

Thursday, March 11, 2010

1.6 hrs
Drill front edge of 7106 to firewall flange.
Edge deburr new wing access covers.
Start laying out battery tray cuts.

Wednesday, March 10, 2010

1.7 hrs
Inventory and store all the bags from the finish kit. Used most of the last Stanley storage tray. Every rivet that came with the finish kit is not needed. I have so many rivets left over from the 1st three kits I could build another plane.


A sign of a sick mind.

Tuesday, March 9, 2010

Finish kit is here!

5 hrs
Continued dimpling 7106 skin. All the drilled holes are done. Reinstalled to allow drilling the firewall attach holes.
Just about then, Mike of Partain transport arrived with the finish kit. His truck couldn't make into the cul-de-sac, so we had to be creative in getting the box up the hill and in the garage. It arrived in exactly the same condition that it left Van's, unlike "Wrong Side Up Shipping". And it was a little less expensive, I think. On the downside, Partain added 5 weeks to the shipping. I mailed the order around Nov 16. Quoted ship date was week of Jan 25. That's a total of 16 weeks. Some of the parts I could have used weeks ago. In the balance I could probably do fuselage finish through the weekend, and then I'll start working on the finish kit.


Inventory finish kit. All present and accounted for. That canopy is a real storage problem.


Looking at what's still to do, they should call it the "Not even close to finishing kit".

Monday, March 8, 2010

1.1 hrs
Start deburring and dimpling 7106 skin. Still need to match drill the leading edge of this skin to the firewall.

A one day weather/DOT related slip in the finish kit delivery. Should get it tomorrow afternoon. Partain's driver is being good about keeping me posted.

Sunday, March 7, 2010

3 hrs, 62 rivets
Countersink pitot mast and finish drilling pitot.
Rivet nutplates to 7103B, 7103C, 721C, 721D.
Rivet angles and 721A canopy deck.
Start riveting 7109 plate and 7108C angle to 7108 rib.
Set two rivets from front 902 bulkhead to longeron.
Drill aft 746 engine bracket to 7105A subpanel.


That's the end of the fuselage narrative. All of the parts are processed, just have to finish riveting it all together after the critical path items are installed.

Looked at how the Stein vents will install. They could go into a special bracket much like the Van's vents do. But my knee needs that space! I'm thinking there is room to the left of the main EFIS display, higher on the panel. I will make a shorter bracket for where the vent is supposed to go, and put the headset jacks there. On the pax side, same thing, with an extra power jack.
The parking brake control will go just above the left 721A deck, in the corner of the panel. That makes it easy to reach from outside the plane, and puts it well in my visual range for a quick before landing check.

Saturday, March 6, 2010

4.5 hrs, 2 rivets
Finally set the lp4-3 rivets at bottom of side skins in front of the wing attach.
Fit and drill 7103B&C angles. Drill for nutplates. Deburr and dimple.
Drill 7108 center rib to firewall.
Disassemble forward deck. Deburr and dimple.
Prime all the small forward deck parts.

Thursday, March 4, 2010

1 hr
Match drill the 7106 front deck skin.

Oh, and I'm supposed to get a finish kit Monday evening!

Wednesday, March 3, 2010

.6 hrs
Finish clecoing 7106 skin to fuselage. Next up is match drilling.

Set the seatbacks in and some cushions to get a feel for how it looks. Need to get the rudder pedals in also, and then climb in and try it out for the first time.


Tuesday, March 2, 2010

1.6 hrs
Now that the panel is clecoed to the plane, it was time to get the panel mockup taped on. I already see things that need to change.


There was a very apropos thread today on VAF concerning enunciators.

Edge deburred the 7106 forward top skin. That's it, the last major piece of aluminum of the kit. Not counting baffles, wing skirts, canopy,....


Start clecoing 7106 to fuselage.

Monday, March 1, 2010

1.1 hrs
Deburr and dimple 7103B&C angles.
Make 721D attach angles. also made one more of the small attach angles.