Van's RV-9A in Aurora

The Big Picture

The Big Picture
Flying! 8/28/2011

Thursday, January 31, 2008

Right HS assembly

Built a jig to hold the completed left HS. Felt bad just letting it flop around while working on the right side. Should have cut one, or even two, extra jig plates when I built up the factory set. Since these aren't super critical (the factory jigs aren't either, really!), I just traced the outline of the cutout onto 1/4" plywood. Didn't even bother to remove the cloth strips from the original. Cut it out with the band saw, attach a 2x4 for a base, duct tape for scratch protection, and voila - a well supported HS half.

With a way to hold the left HS, started the right HS assembly.
Clecoed the front spar to the right skin and nose ribs.


Installed the blind rivets to join the middle rib/spar/nose rib. Really people, the blind rivets are quite sufficient for this application. There's no need to go to extraordinary pain to drive 1/8" rivets at this spot. If there's enough stress on that joint to break the blind rivets, the rest of the plane is already in shards.


Riveted the inboard main rib/spar/nose rib attachment. Did not forget the shim. The -8 rivets are a bit too long, and they're difficult and awkward to drive. Used the double offset universal set for this.

Started riveting the front spar to the skin. Got a good start, driving rivets solo (I never know where that girl is anymore), and then saved the rest for later. I think the secret to driving 3/32 rivets is to use ~40 psi. Too little and it takes too long. To much more, and you greatly increase the chances of damaging the skin. At 40 psi the gun is controllable and forgiving. It does take more to set the 1/8" rib/spar rivets, and even the 4.5 skin/spar/rib rivets take a few extra hits to set properly.

BTW, I love the 3x Souix gun. Don't think twice. Just spend the extra dollars to get it. The trigger lets you adjust how hard and how many times the gun hits. Like the -8 rivets for the inboard nose rib/spar/shim/main rib joint. The rivet can be very difficult to push in. One or two gentle taps with the rivet gun and they're nice and flush, without any violence.

Wednesday, January 30, 2008

Left HS riveting

5.6 hours and 250 rivets!


Monday night
Riveted all four of the intermediate ribs to front spar. Figured it was best to do all of them now rather than trying to do two after the left HS was assembled.
Riveted the left HS nose ribs to the skin. Did this solo, and it was a pain. Much easier with help. But no major boo-boo's in the process. It's hard to get those first, leading edge middle ribs set right. The inboard and outboard ribs are easy. The squeezer makes everything perfect with a little care.
Clecoed the front spar to left HS skin.
Blind riveted mid nose rib to main rib and spar.

The first three blind rivets.

Riveted the inboard main rib to shim, spar, and nose rib. This was difficult. Took me a while to realize the double offset driver was the right tool. Even with this, managed to chew up one of the factory heads a little.


Tuesday
Rivet outboard left HS nose rib.
Rivet most of front spar to left skin.
Katrin doing bucking.

Wednesday
Finished front spar/left HS skin riveting. Started solo, but then got welcomed help.

Now the left side just needs the rear spar.

Riveted all main ribs to skin and outboard ribs to spar.


Katrin and Granger helped with bucking.

Out of all those rivets, only drilled out one. One of the inboard skin/spar/main rib 3-4.5 rivets didn't set properly in the rib tang. Drilled, punched it out, and set a new rivet with the squeezer. I think I tried to drive it with the gun the first time. Wrong thing to do. Also, using side clamp clecoes to hold the rib tangs helps a lot, whenever possible. They get in the way of the squeezer, so it takes some time to get them in just the right place.

Monday, January 28, 2008

HS Assembly

Another nice day, and got a lot done. 2.9 hours, and 100 rivets!
MEK'd and primed all of the VS pieces.

VS ribs primed and drying.

Riveted the rear spar and hinge brackets.

Rear spar and doubler riveting complete ...


... including the elevator hinge brackets.


And finally set rivets in the skin, getting all of the nose ribs in the right side. Katrin did the bucking, and the shop heads turned out great. Not entirely happy with the two center leading edge rivets, but they might get worse if I drill them out.

Riveted center nose rib without mangling the skin.

Used the squeezer on the inboard and outboard ribs.

All three right HS nose ribs riveted in!


Next I'll do the left side nose ribs and then rivet all four intermediate main ribs to the front spar before proceeding.


I expect to finish HS and VS work by next weekend. Then I guess I'm about a third of the way through, and that will have been 7 weeks much of which was startup and learning time. After the rudder, I'll be a bit more than halfway done with the empennage. I think I'll order the wings then.

Saturday, January 26, 2008

Progress

What a lousy weather week in Texas! It was mid 30's and drizzling every day during the week. Still spent 1-2 hrs per night on VS prep to get ready for the weekend, in cold, miserable conditions. Usually had the heater blowing right on me.
But the weekend started out beautiful. Finally able to get the bouganvillas out of the garage, clean up and spread out.
8.9 hrs since last post.

Wednesday - Match drilled the VS skin
Thursday - disassemble VS and debur ribs and rear spar.
Friday - Debur VS skin and front spar. Received confirmation from Bob Avery that the #30 countersink bit is wrong. He thinks it might be for a #6 screw. Other builders have noticed this issue, and a new #30 bit is in the mail. I have to say I'm very pleased with the support and service I'm receiving from Avery, Van's, and all of the other suppliers I'm using.

Saturday - Major progress today. The AN426AD4-6 rivets arrived from Van's so the front HS spar is finally riveted.

HS front spar flush rivets are done.

The weather was perfect for priming, so finished priming all HS parts.


All HS parts primed and ready for riveting

And while the primer was drying, dimpled all VS parts an countersunk the VS spar doubler. Had to really go deep on the countersinking in order to match the dimples in the spar. This took a while since I had to keep setting the countersink cage deeper and redoing the 18 holes that require flush rivets. Used the drill press to do this countersinking, since I had a nice flat surface to work on.


Also drilled the last two holes in the bottom rudder hinge bracket as per drawing 27A. Used the drill press to drill 1/8" holes in the hinge bracket, then match drilled the hinge, doubler, and spar with a #30.

Closeup of countersinking and dimpling.

After all this work, ready to assemble the HS, and prime the VS.

Tuesday, January 22, 2008

Vertical Stabilizer

Started assembly of Vertical Stabilizer. 2.7 hours. On hold with the HS because of wrong AN426 rivets and weather.
Got a phone call and an email from Vans.

Returned the P60G2 wash primer and bought 5 cans of 988. But it's cold and wet, and I don't want to paint in the garage. Have to wait for better weather.

With the VS, match drilled all of the spar/rib/hinge brackets.


Strip cut the outside VS skin plastic (with a soldering iron) and deburred the edges. Got a nasty reminder why wearing gloves is a good idea with the factory new aluminium.


Clecoed the VS skin to the spar/rib structure.


Also cleaned the inside of the HS skins with soap and water in prep for priming, whenever that happens.

Finally found a torque wrench today. On sale, $10 at Pep Boys. But it only goes as low as 120 inch pounds, so it's only good for larger bolts. The search continues.

Monday, January 21, 2008

VS work. 1.7 hrs.
Deburred VS spars.
Clecoed rear VS spar and doubler, back drilled upper 411 bracket.
Fluted VS ribs.
Clecoed VS spars and ribs.

Received confirmation from Van's that the AN426AD4-"6" rivets are really -5.
They've put the correct rivets in the mail.

Still waiting to get more primer before finishing the HS. The weather here is too
bad to prime right now.

Sunday, January 20, 2008

First Rivets!


First production rivets!


Finally set some rivets on the plane.

Only had to drill out three. With two, got too ambitious and riveted the holes where the ribs will attach. You can see where they are drilled out below. With the third, the factory head ended up crooked. Maybe it was a defective rivet. Yeah, that's what happened.

Squeezed most of these, but the squeezer wouldn't reach the bottom three rivets on the angles. These were set with a gun/bucking bar. They'll work, even if just a tad over driven.


But discovered that the flush AN426AD4-6 rivets to be installed on the inner most holes in the front spar are actually -5 rivets as shipped in the kit by Van's. They're too short. An email has been been sent off to Van's.


Hey wait! That rivet's not right.


Sure looks like 5/16's to me. Van's agreed.


Finished deburring all of the VS parts. Pulled the skin down, and will work on cleaning that up before moving on with the VS pre-assembly.


VS structure deburred and ready for assembly.


Saturday:

MEK'd all of the HS parts prior to priming. It's far too cold here so cleaned the parts, then moved them into the house to warm them up. Then ran them out to the driveway for priming. This 988 primer sets up very nice. The first test is setting the rivets in the front spar/doubler. Used a hand squeezer, which is a real challenge with 4/32 rivets. I feel a pneumatic squeezer in my future! But you really test the primer, since the parts bang into everything while you wrestle with the squeezer.

Managed to sneak in 2.2 on this task before going to O & E's wedding. He's the first of "our kids" to tie the knot. They make a great couple, and they have a foundation that'll last a long time. Stupid me forgot the camera.


Primer wembling. Bought the SW PG60G2 wash primer but was stuck on the "no significant corrosion protection" bit in the data sheet. At the last minute decided to use the 988 paint bomb. Not plural because had only one can. But that did all of the HS except for one rear spar, 5 of the main ribs, and the skins. So now I will return the P60G2 and go buy more 988. Really wish they made that in MILSPEC green.

Friday: Washed the HS spars/ribs with "mild detergent" and dried. Just used our kitchen dishwashing soap and our utility sink. The spars were too big for that so took them to the shower. .5
Thursday: We had what passes for crappy weather in Texas. 36F and raining. Can't prime. Cold in the garage. So started pulling parts for the vertical stabilizer. And cleaning off the Van's part number stickers. 1.0 hrs.


Factory fresh VS parts.

Wednesday, January 16, 2008

Last night finished the countersinking on the HS spars and doublers. It took .9 hours, but the actual machine work was only about 3 tenths. As I was getting setup, I discovered that the #30 countersink bit in the Avery cage/bit collection is about 1/128" too big for a #30 hole. It simply wouldn't fit any of the #30 holes I had drilled. At first I started thinking that I had only drilled the holes to 1/8". But the #30 drills I have all fit, and and the AD4 rivets fit. Using a caliper I confirmed that the pilot on the countersink bit is 8.5 64th's where the #30s are just a shade over 8 64ths (.129 according the Standard Aircraft text). I guess I'll have to email Avery and see what they say about it. After about 40 minutes of trying to figure out what was wrong, I decided I hadn't screwed anything up, the countersink bit was wrong, and to just use the #40 bit to do the machining. It chattered a bit, but slow feeding reduced that problem. 20 minutes later, 12 nice countersunk holes.

Now all HS preassembly is done. Next up priming. The weather might not cooperate, so I will start on the vertical stabilizer until the weekend.

Also got in some back riveting practice, using the plate Granger made. The rivets turned out great, and now I feel confident that I can backrivet without messing up any thing. More practice needed with the bucking bar, though. Turning the pressure down to 50 really does help.

Monday, January 14, 2008

Countersunk all HS spar/skin holes. 1.5 hours. My triceps hurt from pressing down on the drill. Now just a few countersink ops in the rear spar and spar doubler (as per detail!) and then it's time to prime.


Visited the Plane Talk hanger in Lockhart (50R) today. The Plane Talk guys are a bunch of experienced pilots and kit builders. They've got a 6 in the hanger, and an 8 under construction. Brought ribs and spars for an appraisal of my finishing work. So far so good. It's great to have a resource like this in the neighborhood. It's 40 miles one/way (now that the office moved), but it makes for a nice long lunch.

Sunday, January 13, 2008

Match drilled left HS. Disassembled. Deburred.
Dimpled all parts. Used 1/2" boards to make jig for DRDT2. Worked great.


A pile of ribs!

Half inch press-board makes a nice table extension for dimpling.


Now setting up for machine countersinking. It would be nice if Vans included a few pieces the same thickness as spars and doublers as scratch material.

Other builders have said that the two shims are included in their kits. I still haven't positively id'd any such thing from my kit. I fabricated from .040 sheet. Seems to work just fine.


10 hours.

Wednesday, January 9, 2008

Last night spent 1 hour with left HS pre-assembly. Got the nose ribs in and the front spar. I was reading on some of the other builder's pages how they had to do a lot of fluting on the nose ribs to get them to work right. Jim Andrews mentions that the new kits come with nose ribs with narrower nose. I can confirm that mine measure about 1 inch. I had to do nothing to get them to fit right. Getting them clecoed in is still a bit of a challenge, but I can imagine it was a major chore when they didn't fit right.


Close up of HS nose rib fit.


I figured out that the HS jig makes a handy way to clamp the skin so that the nose ribs fit. I think I even avoided any dents in the process. There's a couple of minor dings in the right HS from fitting the first nose rib.

As I was putting in the next to last cleco on the front spar, the lights flicker and I hear a couple of pops out in the distance (it was a beautiful evening to work with the garage doors open). Then the lights go out and I hear high voltage arcing from the same location. They came on for a half second shortly after. You could see all of the neighbors houses power up also. But the surge of all those loads at the same time was too much and the breakers tripped for good. Had to finish the last two clecoes with flashlight, and that made a convienent stopping point. The power stayed off for a couple of hours. The entire section of Lakeway was down. The stars were fantastic! Like they used to be when we moved in.

Monday, January 7, 2008

Back to Work!

Since the last post vacation ended and I'm trying to settle into a sane routine. Not helped too much by the fact that the office is about to undergo an all-hands move. 5 days since last post, 9.5 hours of build and 3 of general time.

Tonight worked till 10 finishing the left HS skin, disassemling the left HS rib/spar structure, deburring it, and cleaning the uber-sticky part number tags off the ribs. Doing this on the right side took longer, and also ate up my hands. Used citrus-based Goo Gone, which isn't too bad, but still not good for your skin. This time used the latex gloves and saved my hands. 2.6 hours. I don't intend to work that much every night, but I really wanted to finish the edge sanding tonight.

From the weekend:

The Avery order for 200 more clecoes came in. They sure do have quick turn around. Order placed on Wednesday night, package arrives Friday. Also ordered the small profile female dimple die and flush sqeezers. Even the toolbox has some spots where the full sized squeezer dies are just too big, and will result in deforming the piece being dimpled. One choice is to use a grinder to make a flat spot, but I was going to do that to a spare die. Instead, I just bought the small die and saved a bunch of time with the grinder.

Spent .2 filling in the missing clecoes on the HS right side. Now it’s ready to match drill.


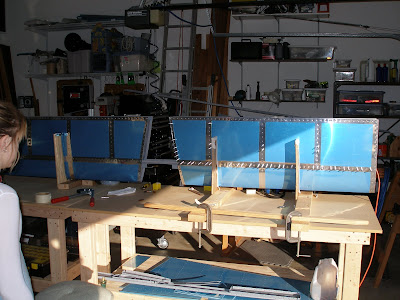
Right HS ready for match drilling.


Granger made a 3’ x 6” (by ½”) back riveting plate for me. It looks like it will work just fine. Bought two pieces of smooth ½ sheet to match the height of the plate. Cut them so that they can be reconfigured all sorts of ways on the top of the workbench to set up a back riveting bench. Much easier and less destructive than trying to put a cutout in the main table surface. Also finally redid the DRDT-2 positioning, so now I can use it for rib flanges. That all ate up the 3 hrs of general time.


New DRDT-2 positioning


Then I match drilled and removed all of those clecoes. I’ve got blisters on me fingers!

Deburred the ribs and spars. Then deburred the skin, and cleaned up the edges. Started preparing the left HS skin. That all took 5 hours and really wore me out (or maybe that was the 6 miles I ran).

Should be ready to start dimpling by mid week. I’ve also been researching primer. Torn between no priming, the P60G2 that Van’s uses on the quickbuilds, and the SW #988 (which is an automotive line product). Bought a can of the #988. Miguel at the Sherwin-Williams store said the can would cover “about a fender”. I guess it depends if you have a cadillac or a Yaris how much that is, but at $10 a can it seems kind of expensive to use this for both sides of the interior structure.

They had a two part product that was equivalent to the #988, it was about $100/quart. Miguel also said that the 988 by itself would not offer very much additional moisture protection without a further coat. So does that mean that the parts that require primer need a top layer?

There’s plenty of testimony in the builders community that no primer is a feasible option. If I hadn’t scratched my alclad parts up so bad during edge treatment, that might have been a reasonable path. But now I have at least some spots that will require priming. In the back of my mind, there’s this comment in the Van’s manual on priming: “The 2024 aluminium is slightly less resistant to corrosion than the alclad coating…”. Does any of the aluminium REALLY need to be primed?
I’ll go by the industrial product SW store today and talk to them about the P60G2.


After a trip to the Sherwin-Williams store

Actually, I went by the store and bought the P60G2. The two gallons of that and the reducer are about $90. Also picked up more emory cloth and a painting respirator. Got home and really read the data sheet. Last bullet under product limitations: "This product does not provide significant corrosion protection". Now having buyers remorse. Should I even use it on the non-alclad parts?

Wednesday, January 2, 2008

Happy New Year

Posting on the the 2nd, but this covers the 31st and 1st. Spent New Years Eve doing odd tasks in the garage, and working on the toolbox kit. The first rivet I drove on the toolbox, for the latch, bounced like crazy, mangled the rivet, and left a big dent in the front of the toolbox. Better there than on the airplane. Also just practiced bucking rivets with all of the bucking bars, 426, 470, 3/32, and 1/8" rivets. Some were OK, some were poor. I think I figured out the air pressure was set too high and I'll try again tonight with 40-50 lbs of pressure. Slowly getting to know the new rivet gun.

Been fretting over whether to buy an air squeezer. Trying to squeeze 1/8" rivets with the hand squeezer is a real challenge. No way my daughter can do it. I have to support the fixed handle and put my full weight on the moving handle to get it done. A pneumatic squeezer was beginning to look mandatory. But if I can get good at bucking rivets, that will be good enough. The 4/32 rivets melt just as easy as the smaller rivets when put under the gun.
3 tenths spent setting up the HS jig.

On New Years Day, spent 4.2 fluting, deburring the spar/rib holes, tweaking the inboard ribs for the 11 degree angle, and preparing the HS901 right side skin for match drilling. Got to use some of the great tools I bought years ago from Bridge City Tools. Fluting the ribs was mainly a matter of checking with a straight edge and making minor tweaks. They were already nearly there, and this was much less trouble than expected.

Inboard Ribs


The reward after hours of filing and sanding - assembly!

Discovered that 200 clecoes is not nearly enough. Counted empty holes and got to 150 before stopping. Doesn't look like it, but you'll need more than 300 3/32 clecoes to do ONE HALF of the HS. Time for another Avery order.

A recognizable airplane part!


Discovered that I missed two holes when match drilling the front spar doublers. Easy enough to fix, just drill and deburr before putting the spar in the HS skin. I'll have to do the same for the left side when it's time.

That's the end of the holiday break build orgy. It was a lot of fun and I got a good start. Now it's time to settle into a routine. At 2000 hours, have to average 12 hours a week for 3.5 years to be on time. But a major constraint will be money. I'll have to clear off my credit card (including the $1000 washing machine purchased over the holidays) save for property taxes, and get a good start on the wing payment before ordering the wings. I expect to run out of HS work well before that happens.