Van's RV-9A in Aurora

The Big Picture

The Big Picture
Flying! 8/28/2011

Wednesday, December 31, 2008

This entry is for yesterday, Tuesday, December 30.
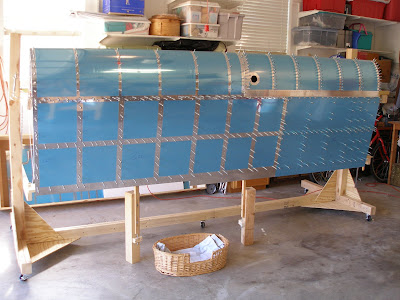
1.9 hrs, 44 rivets.
Riveted the rear spar to the wing frame. Some of the longer rivets on the inboard end are called out a bit too short. For instance the AD4704-6 rivets that attach ribs 3, 4, and 5 to the spar and doubler, really should be 6.5 in length. The 6's as called out on the plans just barely work, but 7's are too long. A better idea would be to cut 7's down to 6.5 And there are 7s and 8s that have the same issue. Time to get a rivet cutter.

Actually flew today! Got a landing in at Lakeway and then flew to Brenham for lunch. Met Mike Torbett. We didn't fly together because I was in a 152 and he was in this:

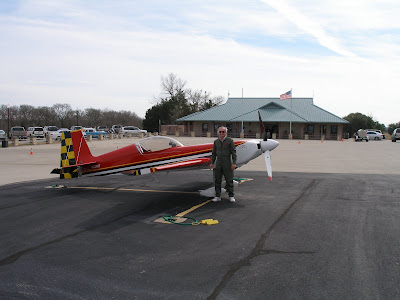
Mike Torbett and his Panzl


Brenham was a beehive. I still find a crowded traffic pattern to be a challenge. As we were walking into the diner, everyone was oohing and aahing over the Panzl. On departure, I left first, with him next. I could hear everyone going (appreciatively) nuts on the radio as he did a high performance climb (after it was requested by the audience). After departing, Mike caught up and flew with me for a little, close to his stall speed.


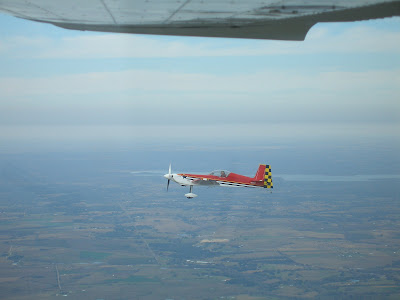
Hamburger at the Brenham Airport Diner: $200. First formation flying: Priceless!

Monday, December 29, 2008


3.5 hrs, 168 rivets
Started by dimpling the left leading edge skin. Just as this was finishing up, Jim and Brenda Robillard arrived. Jim asked if he could help when we were at their house before Christmas, so I invited him over to do some riveting.

We got to work on the leading edge skin and spars. There were a few tricky spots, but we worked through them, and viola, one each leading edge ready to install on the spar. Now Jim is trained in the craft of riveting.

Thanks Jim!

Sunday, December 28, 2008

5.5 hrs, 116 rivets

Finally started riveting on the left wing structure. Started by riveting nutplates to the tank attach strip.


Then got out the gun, and riveted 14 ribs to the main spar. Also reattached 6 nutplates that were drilled out yesterday. And finished by squeezing the forward spar/rib rivets that are covered up by the tank skin.

Figured out that I could squeeze the top and bottom spar/rib main rivets, at least until the spar reinforcing channels got too tall. But by then, the spar channel made a nice guide for the bucking bar.

It was cold in the shop, and it made for a long day. My hands are sore from all that riveting.

Saturday, December 27, 2008

5.4 hrs
Today was spent on final prep of the left wing spars. All the #40 holes on the main spar are countersunk. The compressor would kick on after about 15 holes, I would continue till the next rib attach point and then give the countersink bit and compressor a break by working on the rear spar.


Deburred all the #40 holes on the rear spar during these breaks. When the main spar was completely done, so was the rear spar. Then dimpled the rear spar, and then used the deburring bit to slightly ream out the dimples for a better skin/spar fit.

Lastly, primed all of the countersink cuts on both spars.

It doesn't sound like that much work when typed up like this, but it took quite a bit of time.

Tomorrow the rivet count goes up!

Friday, December 26, 2008

4 hrs today
Spent today fabbing reinforcement angles for the spar. Won't go into any details, but these were prescribed by Van's technical support.

Got about 6 hours over the previous three days. Finished edge deburring all wing skins. Didn't take very many pictures, because the subject is kinda boring. And there's plently of pictures of dimpling and edge finishing from the empennage. Still need to edge deburr the flaps, ailerons, and right leading edge skins. But assembly of the left wing is imminent.

Almost forgot. Simplified the fuel tank leak check setup. Used a simple string, wound tight to secure a balloon to the fuel pickup line. Then a piece of Safe-Air tubing flared and cinched down to the vent line made a good fill up tube. Used a 3/16 bike wheel bearing to seal the tube. A little spit, and it's a perfect seal. The balloon still was deflating so sprayed some soapy water, starting on the inboard rib since that's where the high probability areas are. Instantly, bubbles formed from the BNC connector. Put a small balloon over that to seal it up and no more leaks! Now I just have to figure out why the BNC is leaking and what to do about it. That will wait until the right tank is under construction, which should be about the end of January.

Monday, December 22, 2008

12.2 hrs since last post
Haven't been posting, but have been working on the kit.
Finished deburring all wing skins.
Also primed all left wing ribs, stringers, etc..
Next up is final assembly of the left wing. But we are in the middle of winter here in Texas, and it's frickin' cold in the garage. So spending as much time as I can stand doing prep work.

Used the Sherwin Williams 995 self etching primer with the 997 reducer to prime parts this time. The 988 rattle can is way more convenient, and dries much faster. But with so much surface to cover, using the gun is the only sane way to go. Results turned out so-so, very inconsistent. Needs lots more practise with the HVLP gun to get really good. Tried laying the parts on the ground and hanging them up, and decided I like them on the ground better.

Had to rush priming just a bit, since weather was about to change, and life was calling, asking me to do other things.

It's supposed to warm up a little tomorrow, and then I can start riveting. Otherwise, I'll start prepping right wing parts!

Tuesday, December 16, 2008

6.6 hrs since last post
Due to a busy week and cold weather, haven't been in the garage much. But tonight got the heater cranked up and put in 1.6 hours.
Finished edge deburring top outboard skin. Used one of the tables to hold the skin. Put cushions from the patio furniture (which is wintering in the garage) under the skin to raise it up nearly level with the deburring wheel. This had the side benefit of a nice low friction, scratch proof surface to slide the skin over while working the edge down the wheel.

Next, feathered the leading edges of the inboard/outboard skins where they overlap. This is going to take a little more fine tuning to get just right.
Then started dimpling, starting with the wing walk doubler. After dimpling, then priming and final assembly.

Also put in 5 hrs over the course of 3 days the previous week. All of it was skin deburring and edge cleanup.

Monday, December 8, 2008

1.1 hrs
Dimpled all leading edge ribs. Then dimpled the left wing main ribs.
Finished by dimpling the stringers. Missed drilling one hole on the inboard stringer, so got out the skin, clecoed, and match drilled. Then deburred and dimpled. The inboard skin is next up anyways.

It suddenly occurred to me while dimpling the ribs how to eliminate the fisheyes. Just stick a piece of tape to the male die, so that the tape is touching the work, not the outer rim of the die. It worked great, and seems to last for quite a few dimpling operations.

Sunday, December 7, 2008

6.7 hrs since last post.

Out sick all week. Doctor said it wasn't strep, but sure felt like it. Hard to build when you're drugged.
But did manage to get in a couple of hours deburring ribs during the week, and today, got in 4.5 as the fog lifted a little.

Today finished deburring the main ribs, then used a unibit to cut the 3/4 inch hole for electrical wiring conduit in each main rib.


Mixed up a small batch of proseal and finished closing up the left tank by installing the inboard access plate. An initial leak check proved unsuccessful. The balloon deflates in about 2 hours.


Drilled the tank leading edge attach strip for nutplates, dimpled the strip and the nutplates. Used a deburring tool to cut the nutplates a bit deeper for a better match on the dimples.

Sunday, November 30, 2008

3 hrs
No ProSeal for a change. Disassemble the wing skins and frame. Started deburring, doing the wing walk doubler and the tank attach strip. Also got a couple of leading edge ribs done.

Goofed around with hardware to seal up the tank and check for leaks. Visited a local builder on the bike ride today, and he lent a cap that can be used to seal the fuel pickup fitting.

Saturday, November 29, 2008

7 hours, 221 rivets
Really didn't expect it to take that long, but the left tank baffle took all day Saturday. Katrin helped today. I hate to think how long it would have been without her.

Started by getting everything cleaned up and organized. Then mixed up a batch of ProSeal, which is captivating for kids of any age. With the goo ready to go, sealed and torqued the fuel pickup line fixtures, and then riveted the antirotation bracket on. Forgot to seal those rivets, so the first two rivets of the day were drilled out. After cleaning up, dipped the rivets in ProSeal, and set them again. This time was a take.


Then we did the baggie corner trick to squeeze proseal onto the skin forward of the baffle rivet holes. Dressed up all of the flanges, and put big gobs in the corners, then lowered the baffle in to place. Clecoed it on, and put a few clecoes into the ribs for good measure.

Then riveted the skin/baffle joint. It was messy and slow. On the second side, we got a new pattern established. Starting with a rivet in the middle, remove a cleco on either side of that, and do both sides at the same time. This almost halves the time needed. To take it a step farther, removed the next rivet on either side, and then the third next. That was doing 4 rivets at a go and was vastly faster.

After all the baffle/skin rivets, set the baffle/rib rivets. Used the squeezer on the four corners and the outboard bracket/baffle/rib. But had to get the gun out for the inboard bracket because no squeezer yokes would allow access. Then used the pop riveter to finish off the inner rib locations.


Spent about an hour cleaning up. Katrin stuck with me the whole time, but she was done with that noise by the time we were finished.

That tank took 76 hours, but that included a fair amount of work for the other tank also. We'll see how it averages out.

After a few days of cure time, it's time for a leak test!

Friday, November 28, 2008

Friday 4.2 hrs, 30 rivets
Riveted the end rib on. Mixed 77 grams of proseal and it was more than enough.


Spent a fair amount of time with the capacitive fuel gauge plates and wires. The wires and the tank vent line have to be installed at the same time, making in a bit of a puzzle to get it done in the right order. The instructions have the BNC solder connection as the very first step, but I think it should be the very last step. Get all of the other parts done and the rib installed and BNC installed, then the wire can be trimmed to length and soldered.
Spent time dabbing proseal on the vent line bushings, and the fuel sender wires to prevent any movement.

Used an ohmeter to check the wire connections. Was expecting 0 ohms, but not getting it. Oh. Maybe the meter needs new batteries...

A new battery didn't read 0 ohms, but the audible alert indicates that it is a solid connection between the BNC terminal and the plates, and the BNC collar and the tank skin. I think that's all the testing that needs to be done.


Thursday 4 hrs
Mostly did odd tasks centered on preparing to rivet the inboard tank rib. All day it seemed like I was nearly ready to mix proseal and start in on it. But kept finding odd tasks. Lynne was making sarcastic comments like "They're not expecting us until 5 minutes before dinner". About 1500 it finally sunk in that starting that task was a bad idea.

Trial install vent line, cut to length, bend to fit.
Preinstall fuel guage sender plates and wires. Crimp and solder connector on inboard end of long wire.
Cut and bend both fuel pickup lines.


Fab left fuel pickup line with screen and close off end.
Prepare to rivet inboard rib.

Wednesday, November 26, 2008

10 hrs, 150 rivets
Holy Proseal, Batman!
Mixed up the Proseal and slathered it on. Riveted the three inboard ribs this morning in a 5 hour session. That included all of the cleanup required when messing with the evil goo. A few of the rivets are ugly, but not bad enough to redo. Fortunately they're all on the bottom side of the wing. Go figure, I thought that side should have been the easy part.
Had to drill out a couple. They just weren't going to work.


After a break for lunch, launched into it again. Another 5 hours! And I'm trashed now. Didn't think it would take that long, but when I hit the stop button on the timer, it was 9:57 total. Got the other two inner ribs done, plus the outboard exterior rib, and it's nose reinforcement plate. It was a mistake to launch into that last rib, should have waited till tomorrow. Wasted some time cleaning tools when I realized the nose reinforcement plate still needed doing, so the tools got mucked up again. After 10 hours, I'm trashed. Didn't get a run or bike in today, but it feels like I did a race!


Doing fairly well on Proseal. Still have about 3/4 of the quart left. Should easily do the other tank and all the trailing edges, assuming it's not out of shelf life by then. Today started with about 2 cc of the black part. This weighed in close to 10 grams, so used sticks to draw out 100 grams of the white part into the mixing bowl. This was just enough to do three ribs.

Used lacquer thinner as a cleaning solvent. It seems to work better than MEK, but it smells bad. Actually it smells amazingly like 100LL. It doesn't take a big leap from lacquer-thinner-smells-just-like-100LL-works great-for-cleaning to won't-this-melt-as-soon-as-it's-filled-up-with-avgas? The answer is obvious once you start cleaning up the tools afterwards. It's good for cleaning, but requires elbow grease and many passes. And that's before it's cured. Just don't scrub the inside of the tank while it's full of gas and dissolved ProSeal shouldn't be an issue. Just try to get cured ProSeal off your clecoes two weeks later!

Here's an interesting data point. I left the gummed up clecoes in a jar of lacquer thinner for two days. The ProSeal set up, immersed in lacquer thinner! It was just as hard to get off as if it hadn't been soaking.

Tuesday, November 25, 2008

Tuesday 5 hrs, 66 rivets
Lost sleep thinking about the Proseal task. Realized I didn't have anything to measure with. So after coffee and breakfast, drove to Walgreens and Randalls to pickup a scale, butcher paper, measuring spoons. Stopped at the pharmacy to see if they had any syringes. When you say you don't need the needles, they instantly relax! They gave me 5 each of medium and larger syringes. Score! The syringes go nicely with the 500g scale purchased at Walgreens....

Mixed up the proseal, measuring by weight as best as I could. The scale isn't really good enough to get it perfect, but the end result seems to be OK. Mixed way more than I needed, but even that was just a tiny bit of the quart kit purchased from Van's. Had a perfect day, 60's in the garage, so the proseal didn't start setting up until I was done with all of the easy stuff.

Prosealed and back riveted stiffeners to left tank skin.
Prosealed and rivet fuel filler flange and drain flange


Wow, what a mess! Went through latex gloves like crazy. Need to get another 100!
That all took 3 hours. Took a break to eat and ride the bike.

After the bike ride and dinner, it was dark, and I didn't want to start back up with the proseal

Prepped for tomorrow by clecoing all ribs into the tank skin.


The order from Avery arrived today. They sure do provide good service! A new flaring tool, wire terminal crimpers, assorted squeezer dies, and a SafeAir pitot/static kit.

Crimped and soldered the capacitive fuel sender wires with the new crimper.
Used new flaring tool to flare vent and fuel pickup tubes. Bent the vent line to rough shape by hand. Will have to trim to length after the inner ribs are riveted in. Thought I had a bending tool with the order, but apparently not.


Monday 5 hrs
Roughed up all surfaces to be prosealed. For the ribs, used a stripping wheel purchased at Home and Aircraft Depot. It was a bit aggressive, but it was fast and it'll work fine. For the skin, masked off with painters tape. But didn't want to mount the stripping wheel in a drill and then go after the skin. Instead, used the maroon Scotchbrite pads and the palm sander. This took about as long as just scrubbing by hand, but the results are probably better. And my triceps don't ache, and I don't have blisters.

After roughing, dimpled all tank parts. Used the DRDT-2 as much as possible. The Avery die set is doing a good job, but there are fish eye rings. Dialed it back a bit to get rid of the rings, but then the skin isn't flush up to the dimple. Would rather have the fisheyes, so readjusted to the way it was. Used the tank die set for the ribs and stiffeners, but the regular die on the skin.

Then cleaned all surfaces that will be prosealed. No more delaying after this
.

Sunday, November 23, 2008

6.0 hrs
Match drill tank filler flange.


Match drill drain valve flange. You'll notice this was on the wrong side. After figuring that out, it was moved the other side and match drilled one more time. The narrative says to countersink this piece. But mine was already done. It would have been awkward, since there isn't enough room to get the countersink cage on the part. I continue to notice little odd (but nice!) differences between this kit and those of even just a couple of years ago as documented by other builders.


Fab vent line retainers


Fab and drill cap for outboard rib tooling hole. Dimple cap and rib. Scour for prosealing.


Disassemble tank
Debur all ribs
Debur stiffeners
Rough up bottom of stiffeners
Debur tank skin
Mask tank skin in prep for scouring

Saturday, November 22, 2008

5.5 hrs, 24 rivets
Assemble fuel sender plates and check for clearance.
Trim sender plates for proper clearance, disassemble and debur.
Cut vent lines to rough length and straighten.
Cut fuel pickup to rough length.
Cut out access hole on left inboard tank rib, sand to shape and debur.
Cut holes for vent line and capacitance fuel sender BNC.
Cut fuel pickup hole and anti rotation bracket rivet holes in both access plates.


Match drill access plate to rib.


Debur all rib holes.
Dimple rib for access plate rivets.
Countersink access plate reinforcement rivet holes.
Rivet platenuts and reinforcement to rib.


Placed an Avery order today, tubing tools, and a wire terminal crimping tool.

Friday, November 21, 2008

2 hrs for Friday.
Friday, modified the 10 snap bushings.
Cut the vent tubing to rough length and straightened them out.
Then cut the wires to length and soldered the 15" wires to the BNC terminals. Cut the polypropylene spacers from the supplied tube. To do this, carefully drilled a hole 15/32" deep at the edge of a 2x4 scrap. Insert the tube, use a razor knife to cut flush. Enough tube is showing on the outside to remove from the .25 hole. Cut 12 times and done.

Can't do much more on the sender plates until sealing up the tanks. Proseal is looming closer!

Thursday 1.5 hrs, 18 rivets

Started by laying out fuel sender plate locations for the left tank. Drilled locations on ribs, and enlarged to .25. Countersunk the plates and riveted nutplates. Discovered that I got the outboard plate backwards, but not a problem, I'll just use that plate on the other tank. Gotta pay more attention.

Tuesday, November 18, 2008

1 hour
Not going to make much progress this week. SuperComputing 2008 is in town, and booth duty calls.
Peeled plastic and deburred the edges from all of the capacitive fuel gauge plates and the fuel tank access plates and rings.

Sunday, November 16, 2008

2.5 hrs 36 rivets.
Sanded the tank nose reinforcement plates to shape. Match drilled the outboard plate.
Used the tank nose attach bracket to drill the inboard rib, and then match drilled the inside plate.

Cleaned and then primed the tank attach brackets. But discovered I forgot to countersink for the flush platenut rivets. So did the countersinks, and then riveted the platenuts.


Pulled the capacitive tank gauge kit to get ready for installing it.

Saturday, November 15, 2008

4.9 hrs
Finish countersinking left tank skin.
Drill spar attach holes to #19
Remove tank attach Z brackets.
Debur brackets. Drill brackets for nutplates.


Fabricate both tank nose attach brackets. Made a copy of the plan detail, then cut out the brackets with scissors. Then traced around those patterns, and cut the angle stock on the band saw.


After removing the baffle, put it back on the tank backward, so got confused about inboard/outboard when fabbing the tank attach brackets and match drilling to the inboard rib. As a result, match drilled the tank nose attach bracket to the outboard rib. Doh!
Was thinking I would have to swap ribs and other drastic recoveries, until I realized that the reinforcement plates use the same drill pattern. So, no problem. Just use the rib to match drill the reinforcement plate.

Cut all nose reinforcement plates. Finished the left inboard plate, ready to match drill.

Thursday, November 13, 2008

1.4 hrs
A sane workload today.
Finished match drilling the left tank skin.
Then set up the countersink cage, and countersunk the row of skin to baffle holes on the skin,
getting the bottom side done.

Wednesday, November 12, 2008

1.7 hrs
Clecoed left tank to spar, again.

Drilled attach brackets to 3/16. Afterwards, realized I should go one number smaller on these, and use the reamer I bought to bring them up to 3/16.


Drilled the 919 tank/attach strip holes. Went right for the #19, since these will be #8 screws.

Measured the wing twist again. It's less than 1/16 inch, well less than the tolerance spec'd in the manual.

Removed the tank from the spar, and cleaned up. It's not mentioned, but I spend a lot of time cleaning up shavings, and putting away tools.
Started match drilling the tank assembly. Leaving the tank attach brackets on till last (there are two more holes to match drill) since they hold the ribs in final alignment.

There's a bunch of plumbing and capacitive fuel sender work to get ready. After that is final tank prep and the evil goo. That may happen over the Thanksgiving break.

Tuesday, November 11, 2008

2 hrs
Started by cutting the angle for the inside tank nose reinforcement and attach bracket. Did this to get scrap for making a pop rivet jig. But after cutting one of the flanges to the measure shape, decide there was not enough material to make the jig. So found some other scrap, cut it to size and made up the jig, as featured here. Mines not as nice, but it worked fine. This is needed because the holes are too close to the bracket webs, so the rivet gun can't get the right angle to properly set the rivet. The jig allows the gun to be at an angle for clearance, but the rivet is pressed flat into the hole. The pop rivet shaft bends at the jig, but that's not a problem. This all took an hour.


Next used the jig to pop rivet the tank attach brackets. The jig is easier to make than defacing the pop rivet gun! After setting two rivets, decided to match drill all baffle to rib holes. Marked the two that were already riveted to do later. One builder forgot this till later and had a messy recovery.


Finished all the pop riveting and then trial fit the tank. It sits on fairly well. Just about a 64th gap on the upper outboard corner. Took it off and fussed, reseting the outboard tank rib. There is also a slight mismatch in the two leading edge skins right at the nose. I think the tank skin isn't shaped to the rib quite as well as the thinner outboard leading edge. This leaves a small gap between the upper leading edge skins, and the main skin. All the other joints fit perfectly.

Monday, November 10, 2008

1.5 hrs
Clecoed the tank attach brackets to the left baffle, after figuring out the orientation from the plans. Put the baffle and the tank brackets onto the spar to check the fit. Looks just right, all the holes and flanges are in the right place. Then drilled the brackets using the baffle as a guide.

The plans say to drill the spar side tank attach hole to 3/16s. I don't follow this. Doing so will fix each bracket on the spar. But they're already fixed to the baffle. Put the baffle/brackets back on the spar. From underneath all the holes line up reasonbly well. But it seems better to let the skin attachment set where the brackets will be, and then drill the 3/16" holes. I'll look at it again when the brackets are temp riveted and the tank assembly is on the spar.

Deburred the brackets and the baffle. Stripped the plastic from the baffle. Weird to think this piece of metal will be holding in AvGas.


Then clecoed the baffle to the skin. Counted over 200 clecos in the tank assembly. 500 is not really enough to properly build a wing. Doing both wings at the same time would require close to a thousand, assuming you have them both in the same state with top skins, leading edge, and tank all clecoed together.

Sunday, November 9, 2008

5.5 hrs
Started this morning by stripping the inner plastic from the tank skin and clecoing the ribs in place. Granger helped with this, it's definitely a two person job.

Couldn't resist placing the tank skin on the spar for a photo op!


After a bike ride, used the belt sander to final shape all of the tank stiffeners. Then edge deburred all of them on the scotchbrite wheel.


Then clecoed the stiffeners to tank and match drilled. I had just ordered a 100 clecoes, but now I'm down to the last few. They're all in use, and I'll have to scavenge some from the preassembled wing to finish the tank. I think I have 500. I might just get by with the extras that the Gunny gave to me.


Next, went to work on the tank attach brackets. Found the drill guides that came with the kit, so the time spent yesterday carefully making one was mostly wasted. Mostly, except for gaining a good understanding of the geometry.


Spent some time getting the drill press setup to drill the first holes in the tank brackets. Was able to accurately drill to within a 200th or so, I think. I had it set up so that the drill guide was not even necessary, but ended up using it as a check for all but the last two brackets. Only used one of the drill guides. BTW, I don't think the DGs are perfect. They are accurate from one set of edges, but not necessarily perfectly centered. Be sure to measure carefully and decide which two edges to use as a reference, and mark them.


Then deburred the holes. Next up was marking the center lines on the brackets. I puzzled about the best way to do this. Ended up making a set of shims from the material in the trim bundle. That along with leftover bar from the very first empennage angle cut, gave the perfect depth to nest two tank brackets so that the edge of one was exactly the right place to mark the center line with a sharpie.