Van's RV-9A in Aurora

The Big Picture

The Big Picture
Flying! 8/28/2011

Tuesday, March 31, 2009

1.0 hrs
Finished deburring left flap fairing.
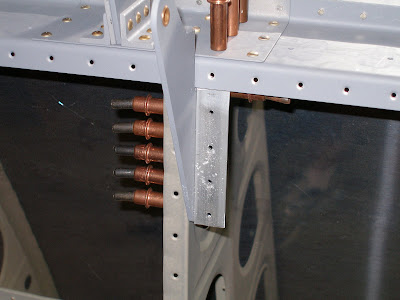
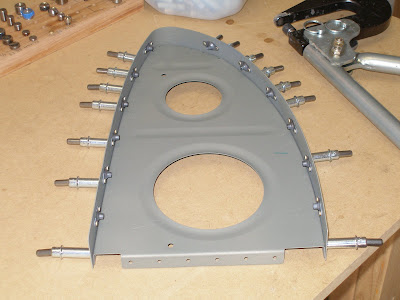
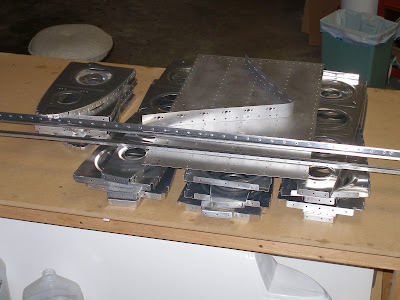
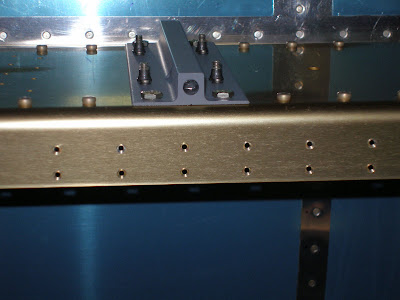
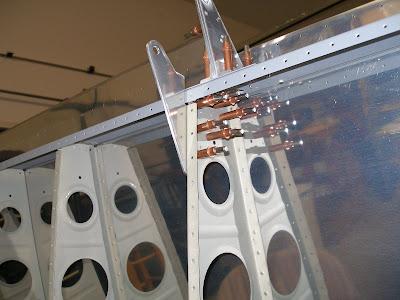
Final drilled right aileron attach brackets and inboard and outboard flap attach brackets.


Started deburring. Will easily finish next day, which may be Thursday. Then wash and prime parts.

I may skip slightly ahead and match drill the right rear spar fairings. Can't see any reason not to, and it would be good to prime those four parts all together.

Monday, March 30, 2009

1.4 hrs, 11 rivets
Bought a sheet of 1 inch MDF. Had an adventure on the east side of town trying to find it. The place wasn't where I thought it was. Wanted to rip it in two there, but their saw was only set to cut on the 4 ft dimension. So we managed to squeeze a 49 inch wide sheet into my Honda Odyssey. It just barely fit.
Got it home, extracted it from the van, and used the circular saw to rip it lengthwise. Now I have two pieces of 2' x 8' x 1" MDF to make the aileron/flap construction table. Each piece now weighs about 80 pounds. The finished product will require two people to move. It'll have its own gravity field!

After dinner, finished all remaining right wing top skin/rear spar rivets, and one missing on the front spar, the most inboard and forward rivet. Forgot to get it when we were doing the most inboard rib.

Received a care package from Avery. A long rivet set, and the short single offset rivet set. As I said, I didn't see why this was necessary. When you get to the flap brackets, you'll understand. It made the task easy instead of rivet butchering impossible. I think this comes in the standard kit, but I didn't go that route. You can wait till later, but you will need this rivet set. I think only the eighth inch set is needed, at least the RV-9 kit hasn't had any 3/32 AN470 rivets, and no larger rivets (so far).

With the new set, finished riveting middle flap attach bracket for left wing.

Remove left wing fairings and start deburring.

Sunday, March 29, 2009

1.2 hrs, 114 rivets
Today started a bit cool but turned out to be a gorgeous day in Central Texas. Got moving and realized that March was ending quickly and I hadn't flown since the beginning of February. Way past time to get some landings. Checked the weather, perfect conditions until the winds picked up around 2. Checked the planes, hey, one of the 172's is avialable at 11. So booked the plane and did the rest of the pre-flight stuff. To top it off, the rates wnet down to just expensive, instead of outrageous and painful, due to relief on fuel prices. Woo hoo, maybe I can fly enough to really be current, instead of just legal.
Got in two touch n goes at Lockhart. Got there just in time, the pattern got busy as I departed. Two decent landings. The landing in Austin was decent for a stay high, land long to avoid the rotor from the regional jet that just landed. The wind was calm on the ATIS, but it was just picking up on the runway. As I got the mains down and got it slowed to about 50, a gust grabbed the right wing and lifted me completely off the ground. Great, catty-womp, stall horn blaring. But fought it back level and got the mains down gently, and then the nose. Three decent landings. Of course that was with no wind to speak of.

After the drive back from Bergstrom, ate lunch and got ready for my riveting help to arrive, Jim Darrah, Hombre mas Mejor! We realized he hadn't had the riveting clinic, so we started with that. Forgot to dial the pressure down on the regulator, so he had an extra challenge with the gun. After that we sat down and cranked out the right wing J-stringer rivets.

That completes the top side riveting on both wings, save the 5 inboard most rear spar/skin rivets. We moved the wing to the cradle. Sure looks nice.

Broke up that party to attend another, Orion's 30th birthday! I remember when O was three years old. Egads, he's already older than I was then! By a lot!


After getting home, had the pleasure of tearing down the wing stand. That thing was awkward and in the way. Glad it's gone. Charged an hour to misc..

Saturday, March 28, 2009

5.4 hrs, 468 rivets
Started the morning by clecoing and match drilling the left wing aileron and flap fairings.


Then started edge deburring on flap spars.


About then the calvary arrived, one each Romanian compiler developer named Sebastian Pop.


After the standard basic sheet metal course, we settled in and started riveting wing skins.
By the time we were done, we had a new one day rivet count record: 468 rivets! And we finished the main skin/rib/spar riveting tasks. The only thing left to do is the J-stiffeners.

Merci beaucoup, Sebastian!


Friday, .9 hrs.
Pulled the aileron fairing and did the edge deburring. Also did the aileron spars.
Spent some time reading the rest of the wing instructions. Nearing the end of the main wing phase, shifting soon to ailerons and flaps. Should finish all practical wing work in time to take a short break before the fuselage arrives. Maybe I can even get some flying in!

Thursday, March 26, 2009

1.9 hrs, 63 rivets
Squeezed 27 rivets on right wing rear spar/skin. Filled in the rear spar rivets between the ribs we set last night.

Riveted left wing flap attach reinforcement angles. These are a bit difficult, but most of the rivets turned out fine.


Got all but three rivets done. The offset rivet set I have makes the gun too long to fit into the rib bay to get the middle C bracket to rib rivets done. And they're too close to the spar for the short straight set to work. It looks like there's finally a reason to have that set with the small crooked tip. I always wondered what good they were. Time to place an Avery order.

With most of the rear spar riveting done, decided to try on the flap fairing. It doesn't fit perfectly with out all the clecos in, but it sure does add a finishing touch.

Wednesday, March 25, 2009

1.5 hrs, 70 rivets
Jim and Orion Robillard responded to the facebook call for riveting help. We started with the usual riveting clinic for Orion, but Jim just couldn't stand it and wanted to try it also!

After that we started in on the right wing skin riveting. Got four ribs done, plus the skin/spar rivets in between. It was a great start on the wing. The results look better than the left wing. I'm wondering now if the plane will fly in circles because one wing is built without the benefit of a great deal of experience!

Still looking for more help. Will use the squeezer on the rear spar/skin rivets in the meantime.

Managed to countersink and prime the flap attach angles, despite a rain storm that came through just as I got home.

Tuesday, March 24, 2009

1.5 hrs, 8 rivets
Riveted the left wing middle flap attach bracket to the rib.
Clamped and drilled the middle 925B and C parts. Of course first had to machine countersink the first hole on the 925C.
Deburr middle 925 parts and cleco back on.
Fit bottom skins to wing. Those wings look very cool with both skins on, even when there are clecoes involved.


Match drilled all three 925C brackets for holes in skin.


Removed the bottom skins and deburred them. Put them back in storage.
Disassemble the 925B and C parts one last time. Deburr the newly drilled holes.
I was going to countersink, but there's no real hurry. It was dark, and I started getting concious of the noise I was making. It's a school night for the neighbor kids.

Finally getting some riveting help lined up.

Monday, March 23, 2009

1.0 hrs
Clean and prime left middle flap attach bracket.
Pull flap fairings.
Edge deburr both flap fairings.
Deburr reinforcing flap attach reinforcing angles and cleco to wing assembly.

Sunday, March 22, 2009

6 hrs, 48 rivets
Worked on the left wing aileron and flap attach hardware. These tasks take a bunch of time, and use just about every tool in the box.


Match drill, debur, and prime aileron attach brackets. Was getting ready to rivet, looking at the plans for the details, when I realized there were some 426 rivets called out. So had to do the countersinking after the parts were primed. Then used the squeezer for most of the riveting. Only needed to shoot the rivets closest to the top skin, since the longeron yoke wouldn't reach.


Also countersunk the parts for the right wing.

Match drill inboard and outboard flap attach brackets, and then prime them. Primed these parts and all the aileron bracket parts in one batch.
Went for a run and ate lunch while the primer set up.

Then riveted flap attach brackets to ribs.

Align and clamp middle flap attach bracket, and then match drill to rib.
Debur ribs and middle flap attach bracket.

Match drill inboard and outboard 925B and C angles. Machine countersink the C parts for the hole that matches the spar flange.

Saturday, March 21, 2009

2.1 hrs
Can't find anyone to help with riveting so started in on the flap attach hardware.
Fabricated the 925B and 925C angles. This was mostly bandsaw work.


Also made the 906C shims and started on the 906A attach angles. Unfortunately, an
incorrect measurement rendered the two 906A pieces useless. And the angle stock is just too small to get four parts out of it. Doh! I'll be ordering another piece of angle in the near future.

In other news, got the official ack from Van's on the fuselage order. Ship date given as 4/27, which is a bit less than 8 weeks. Woo Hoo! Now I just have to figure out how to pay for it.

Thursday, March 19, 2009

.6 hrs
Cleco skins to right wing.

Wednesday, March 18, 2009

Right wing leading edge finished.

2.0 hrs, 110 rivets
Finished riveting the leading edge to the right spar, setting the skin/spar rivets.

After that, trimmed the tank skin a bit with a file at the outboard aft lower corner. Installed the tank on the spar. The attach bracket bolts all lined up perfectly, was able to get them all threaded in by hand with no fussing. The top side screws were a bit more difficult, but eventually it all settled in. I think I'll trim just a bit more off the skin where it's too tight to the leading edge skin, but that can wait.


Next task, main skin riveting.

Tuesday, March 17, 2009

2.3 hrs, 42 rivets
Riveted right leading edge ribs to the spar. Katrin helped, and we got all the riveting done in about 1.3 hrs.


Started fitting the tank to the spar. The outboard bottom rear of the tank skin overlaps the leading edge just a fraction. Other than that it seems to fit pretty good.

Just realized I still need to set all the leading edge skin to spar rivets. That's the next task.

Monday, March 16, 2009

1.5 hrs
Dimpled both topside skins. Was most of the way done when I realized the dimples weren't so great. Swapped out dimple dies, now using the Isham die set. The remaining few dimples look fine. Couldn't fix the remaining dimples by setting again.

Masked and primed the overlap where it was filed down on both skins.
Done with main wing prep, now just need help bucking rivets.

Sunday, March 15, 2009

5.5 hrs, 18 rivets
Setup wing on stand and check for twist.
Cleco leading edge to spar.


Using the squeezer, set the forward main rib/spar rivets that are hidden by the tank skin.
At this point, need the girl to show up to rivet the leading edge to the spar. So while I was waiting, started edge deburring on flap attach brackets.
Then remembered that I needed to deburr both right top wing skins. So got that done.
Then filed leading edge overlap on wing skins. Dimpling can be done while waiting for riveting help.
At that point on the right wing where I need help to make progress.

Saturday, March 14, 2009

4.5 hrs, 12 rivets
Started by trial fitting all nuts and screws for attaching the right tank, prior to installing
the tank.
Then finished up the leading edge light lens installation.
Drilled and dimpled holes for attaching the lens.
Trim and finish lens.
Drilled, dimpled, and riveted nutplates for lens attach strips.
Then put it all together with the #6 screws.


Now on to the leading edge/spar riveting.

Wednesday, March 11, 2009

1hr
Cut, file, smooth, sand, and scotchbrite the leading edge light cutout.


Used the cutoff wheel on the new air grinder.

Tuesday, March 10, 2009

Fuselage order is in the mail!

1.5 hrs, 49 rivets
Finished right leading edge assembly. Did all the riveting solo.


Started on the leading edge light installation. Riveted the base plate together, then installed platenuts on the #6 and #7 ribs. This would have been a LOT easier if I'd remembered to do it before riveting the ribs to the skin. Doh!

Layed out the hole for the lens and started cutting on it. Wanted to just start it, and will finish the cut tomorrow.


As the post title says, another watershed event occurred. The fuselage order is now in progress. 9 weeks puts arrival somewhere around the second week of May.

Sunday, March 8, 2009

4.0 hrs, 156 rivets
Place wing frame on stand.
Countersink and prime nutplates for tank attach splice strip.

Cleco ribs to leading edge skin.


Start riveting ribs to right leading edge.

Saturday, March 7, 2009

4.2 hrs, 124 rivets.
Rivet the right wing skeleton together.
Started by riveting the 3 inboard tank attach nutplates to the main spar. Those are some of the toughest rivets to set up to this point. They rank right up there with topside leading edge rivets.


Then riveted the 14 inboard ribs to the spar.


Clecoed the rear spar on, and the outboard main rib. Then riveted all the ribs to the rear spar. All except the center hole on the inboard rib, since it gets done in assembly with another part.

Friday, March 6, 2009

3.5 hrs
Took a day off and made some progress on the wing.

Started by priming the big pile of wing parts. Took 1.9 hrs to get it all done. Very happy with the results, it turned out much better than the left wing. Used the Sherwin Williams self etching primer shot from the HVLP trim gun. The magazine on this gun is just big enough to do one side of a batch of 5 main ribs. Since that's the way they were layed out, it worked just right.
It was a bit windy today. But the house is downwind from a large ridge, and a south wind is always gusty with lulls of relative calm. Just wait for the gusts to subside, and then there's a minute or two of calm.


While the primer was curing, worked on dimpling. Dimpled the rear spar, and used the deburring bit to remove just a bit more metal as per the instructions. Then used the 988 rattle can primer to protect the bare aluminium.


Also dimpled the leading edge skin. Now there's enough construction work to last the weekend. Will have to deburr the main skins and get them dimpled. Will be looking for help bucking rivets by next weekend.

Thursday, March 5, 2009

Thursday 1.5 hrs
Alodined main spar.

Wiped down all other parts to get ready for priming.

Wednesday, 1 hr
Washed all parts with soap and water.


Tuesday .5 hrs
Finish dimpling main ribs. Scuff the wing walk doubler.

Monday .3 hrs
Finish scuffing main ribs.

Purposely doing just a little at a time. Haven't ordered the fuselage, and the wing will be finished before the fuselage gets here.

Sunday, March 1, 2009

1.9 hrs
Continuing with right wing final prep. Getting ribs ready for priming.
Scuffed main rib flanges, and started dimpling.
Dimpled the tank splice plate, and the wing walk doubler.

Went flying today, as a right seat pax on the 3R9 flyout to Stephenville. Our destination, the Hard 8 BBQ, was just voted best flyin BBQ in the country last week. The BBQ was good, the atmosphere is great, the company was awesome. I have a tendancy to avoid social interaction, but I really had fun today. Got a few minutes at the yoke in a Piper Dakota.