1 hr
Mixed up a batch of proseal and took care of some critical path items.
Glued screens to the fuel vent exterior fittings.
Also sealed up a few areas at the bottom where the three fuselage skins join. There are some small gaps there where the curved 970 meets the aft fuselage.
And sealed around the steps. Now that that part is done, I can finish installing the insulation this weekend, and then that's one more thing that was in the way of riveting the baggage compartment floors.
The other big critical path item is priming and painting the flap actuator parts. I want to get that done before any riveting. But I messed up and didn't get any priming done when it was warm on Sunday. Now it's cold and wet again.
Monday 14 Dec.
.5 hrs.
Fabbed the fuel vent fittings. Cut the 45 degree angle and smoothed it all out.

Van's RV-9A in Aurora
The Big Picture

Flying! 8/28/2011
Sunday, December 13, 2009
4 hrs
Finally a nice day in Central Texas. We suffered through two nasty, cold, wet weeks. Those were the lightest two build weeks for me all year. But as I said yesterday, I still managed to get some time on electrical design.
Finished installing the main gear weldments. The plans say nothing about it, but I put an .063 shim between the weldment flange and the sides. That's the flange with the 5 AN3 bolts that have to be drilled through the skin and weldment. I saw other builders pictures and they too had a gap between weldment and longerons. .063 was the perfect thickness.

One small item was the 7 AN4 bolts that attach the weldment to the spar. These need to be drilled out to 1/4", and this would have been much easier when the spar was still on the bench. Fortunately the Brown angle drill kit has a 1/4" threaded bit, but it's a bit treacherous to use.

The bolts aren't torqued yet, but I'll do that when installing the wings for the first time.
Started looking at the forward cabin plumbing. I bought a Matco parking brake valve, and it needs to be incorporated into the brake design. And the Andair fuel valve changes things a bit - by making it easier. If you're looking at the price of that Andair valve and thinking it's too expensive, I can promise you will not regret buying it. I recommend buying it at Oshkosh or Sun n Fun. It's money well spent.
Finally a nice day in Central Texas. We suffered through two nasty, cold, wet weeks. Those were the lightest two build weeks for me all year. But as I said yesterday, I still managed to get some time on electrical design.
Finished installing the main gear weldments. The plans say nothing about it, but I put an .063 shim between the weldment flange and the sides. That's the flange with the 5 AN3 bolts that have to be drilled through the skin and weldment. I saw other builders pictures and they too had a gap between weldment and longerons. .063 was the perfect thickness.
One small item was the 7 AN4 bolts that attach the weldment to the spar. These need to be drilled out to 1/4", and this would have been much easier when the spar was still on the bench. Fortunately the Brown angle drill kit has a 1/4" threaded bit, but it's a bit treacherous to use.
The bolts aren't torqued yet, but I'll do that when installing the wings for the first time.
Started looking at the forward cabin plumbing. I bought a Matco parking brake valve, and it needs to be incorporated into the brake design. And the Andair fuel valve changes things a bit - by making it easier. If you're looking at the price of that Andair valve and thinking it's too expensive, I can promise you will not regret buying it. I recommend buying it at Oshkosh or Sun n Fun. It's money well spent.
Saturday, December 12, 2009
3 hrs
Started installing the main gear weldments. On the nose-dragger, these are two seperate heavy pieces instead of the integral engine mount front gear attach found on the tail-dragger design. They bolt to the front of the main spar carry through, and there are holes drilled through the side for various bolts and screws.
It takes a lot of time to work with these because when you get the bottom main wing bolts installed they're very difficult to remove, even with the hardware store temp bolts. That's because you can't get a straight shot at either of them to drive them back out. It's a real pain.
I hope I don't have to remove the close tolerance bolts, ever.
Oh, yah. Since there are couple of wiring tasks that will soon be in the critical path, I've been spending a bunch of time on electrical system design. I'm most of the way through reading the Aeroelectric Connection, and I've been using ExpressCAD to work on the schematics. Still a ways from being finished, but I'm finally happy enough with the progress to start cutting wires.
Tuesday, December 8, 2009
1.6 hrs
Trim flap assembly side cover for bolt clearance.
Finish cutting out sound proofing mat. Peel and apply to baggage bulkhead.
I realized that this might be a safety hazard. If this stuff comes loose, it will be flopping around in the back with a high probability of being in contact with the elevator pushrod and bellcrank. I don't think that would be catastrophic, since I don't think it can jam anything, but I need to keep a close eye on it. It it even looks like it's going to peel in the heat, off it comes.
A growing backlog of stuff needs priming and painting. But too cold and humid, with no relief in sight on the forecast.
Went to Harbor Freight today at lunch and bought a small sheet metal bending brake, and to West Marine to buy vinyl cable sheath for the rudder cable.
Sunday, December 6, 2009
6 hrs, 26 rivets
Started out cold and miserable. But the day warmed up a bit and the heater was able to make it tolerable in the garage.
Rivet nutplates for flap center bearing block.
Rivet nutplates on bellcrank rib.
I've decided to use a simple hinge arrangement as baggage tie downs, one in each corner, which also means one on each of the side panels.
Cut hinges for baggage tie downs.
Drill, deburr, countersink, and rivet baggage tie down hinges to side covers.

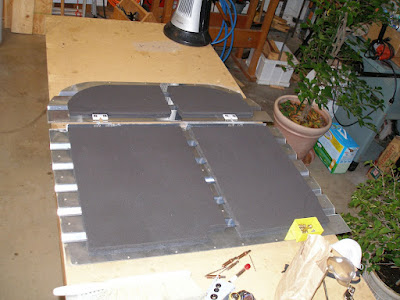
And now starts the adventure with the sound proofing. I bought the same material that Smitty used.
Mark and cutout templates for sound-proofing mat. Used wax paper, held in in place, and traced the outline of each panel with a bit of deburred scrap .032. Then cut the templates out with scissors. It's amazing how often I use a simple pair of scissors as part of the build.
Started cutting out sound proofing panels. Used the templates, a straight edge, and a razor knife. Did this while watching a football game inside.
Getting closer to being ready to secure the floors, but I will still wait until wiring is mostly done before riveting them down.
Started out cold and miserable. But the day warmed up a bit and the heater was able to make it tolerable in the garage.
Rivet nutplates for flap center bearing block.
Rivet nutplates on bellcrank rib.
I've decided to use a simple hinge arrangement as baggage tie downs, one in each corner, which also means one on each of the side panels.
Cut hinges for baggage tie downs.
Drill, deburr, countersink, and rivet baggage tie down hinges to side covers.
And now starts the adventure with the sound proofing. I bought the same material that Smitty used.
Mark and cutout templates for sound-proofing mat. Used wax paper, held in in place, and traced the outline of each panel with a bit of deburred scrap .032. Then cut the templates out with scissors. It's amazing how often I use a simple pair of scissors as part of the build.
Started cutting out sound proofing panels. Used the templates, a straight edge, and a razor knife. Did this while watching a football game inside.
Getting closer to being ready to secure the floors, but I will still wait until wiring is mostly done before riveting them down.
Saturday, December 5, 2009
1.3 hrs
My wife graduated today with her Masters of Education. That and christmas decorations took precedence over building.
Did manage to sneak in a little time on the kit.
Make static clips. Finaly figured out a good way to do it. Plus it can be done inside while watching football.
Dimple top J-stringers and 787 center rib and reinforcing plate.
Dimple 710 bulkhead.
Drill 705 bulkhead and baggage rib for nutplates holding the flap bearing block.
Friday Dec 4
1 hr
A few miscellaneous items, just too cold. We had snow - for about 5 minutes and then the sun came out. Reworked the static port hookups based on pictures posted by Tony Phillips. Hi Tony! Also finished reaming the right main gear bolt hole. The gear weldments are ready to go now.
Subscribe to:
Comments (Atom)
