Van's RV-9A in Aurora

The Big Picture

The Big Picture
Flying! 8/28/2011

Saturday, January 31, 2009

4.5 hrs, 64 rivets
Clean and mask right tank skin for riveting stiffeners.
Clean stiffeners, filler flange, drain flange.
Proseal and rivet stiffeners.


Proseal and rivet fuel filler and drain flange.


Prepare strip for sealing tooling hole on outboard rib.
Started masking tank skin in prep for riveting ribs.

Wednesday, January 28, 2009

1.2 hrs
Freakin' cold in the garage, so just a few miscellaneous items.
Removed stringers and leading edge from right wing. Cut hole for right wing tie down in leading edge skin.


Clecoed outboard skin to left wing.

Monday, January 26, 2009

1.1 hrs
Dimpled ribs, skin, and stiffeners for the right tank. Just another pass of washing, then MEK, and masking and it's ready to go together. Have a few things to do this week after work, so proseal may wait until the weekend.
Also spent a bit of time drilling holes on the wing cradle.

Sunday, January 25, 2009

4.1 hrs
Countersink fuel filler flange.


Disassemble tank.
Debur skin, ribs, stiffeners.
Mask baffle and skin, scuff with scotchbrite.


Scuff ribs, stiffeners, and other small parts, like drain and filler flanges, vent clip.
Wash tank parts with soap and water.
Realized all parts still need dimpling. Oh well, it won't hurt to wash skin, ribs, and stiffeners twice.


You might have noticed that the pictures are now links to the original photo. This is new as of about two weeks ago. Before that, pictures were not links. The google blog utility allows uploading of photos. A painfully slow process with the DSL line provided by SWBell (OK, OK, AT&T). It took a while, but I figured out that these uploads were being stored into a Picassa web folder. I did add a link to that folder in the margins. But now I started uploading pictures directly to Picassa web, which isn't any faster, but does offer nicer upload widgets. Then I paste a link created by PW into the blog entry. It comes complete with this new link feature that gives you the original jpeg captured by the camera. Follow the link to the picture and now you can zoom in and see detail. All of the old pictures are also saved in the original format, it's just that there's no link on the blog directly to them. You just have to hunt through the PW albums.

Saturday, January 24, 2009

4.5 hrs, 30 rivets
Right tank final prep. Making great progress, this tank will be done in two more weeks.
Match drill ribs for capacitive fuel sender plates.
Dimple and debur inboard capacitive fuel sender plate (had already done the outboard plate), rivet platenuts.
Trial install of plates and ribs in tank assy to check clearance.
Trim plates for proper clearance.

Cut access hole in inboard rib, debur. Used the unitbit to cut a ring almost all the way around. The final bit was cut with snips. Final trimed with a drum sanding bit, finish sand with fine sandpaper, then polish with the scotchbrite wheel. This took a while, but worked out great.


Match drill screw holes for access cover.
Match drill platenut holes for reinforcing ring.
Dimple platenut #40's on rib.


Countersink reinforcing ring for dimples on rib.
Rivet reinforcing ring and platenuts to rib.


Match drill tank filler flange to skin.
Match drill tank drain flange to skin.

Friday, January 23, 2009

1.9 hrs, 36 rivets
Debur, wash, mek, prime attach brackets.
Match drill tank nose attach bracket to inboard rib.
Sand nose reinforcement plates for proper fit.
Match drill nose reinforcement plates to inboard and outboard ribs.


Rivet platenuts to tank attach Z brackets.


Will start on fitting the capacitive fuel sender hardware tomorrow. Should have most of the prep work done by the end of the weekend, then it's fun with proseal.

Thursday, January 22, 2009

2.3 hrs
Finished countersinking tank skin.
Drilled skin/spar screw holes to #19.
Removed brackets and baffle.

Drilled and countersunk brackets for platenuts. Puzzled over how best to drill the platenut mounting holes. The #8 platenut jig is almost sufficient, but the #19 post is just too much smaller than 3/16 to get an accurate centering. Then I remembered how it worked for the left tank - use one of the 3/16 bolts, thread a nutplate on to it, align, clamp, and drill one of the #40s. Cleco, and drill the other #40. Presto! Instant nutplate drilling jig. Repeat 17 more times.


Wednesday, January 21, 2009

1.5 hrs
Final drilled right tank skin/ribs. Started countersinking tank skin for skin/baffle rivets.

Tuesday, January 20, 2009

1.5 hrs
Installed temporary pop rivets for tank attach brackets.


Clecoed tank to wing. Is that cool, or what!


Drilled tank attach brackets. On the first hole, the 3/16 drill bit was taking a very long time. So decided to predrill to #30. But how to center the pilot hole? Solution: Start drilling each hole with the 3/16. This forms a nice centered hole that keeps the #30 in exactly the right place. The #30 goes quick, and then following with the 3/16 is equally quick. Be sure not to drill too deep, the tank baffle is up there somewhere.

Also drilled the splice strip. Started with #30, then #27, then #23, then #19. The 19 was a bit too much of a jump, should have gone #20, then #19.


Remove the tank from the wing. Now all of the clecos can come out of the wing.

Monday, January 19, 2009

500 hours!

1.7 hours tonight pushed the meter over 500.
Worked on the right tank.
Match drilled tank attach brackets to the baffle.


Deburred brackets.
Final drilled baffle and tank ribs.
Deburred all baffle tank attach and rib holes.
Then clecoed the baffle and brackets to tank ribs, and then skin to the baffle. That's what all those clecos were needed for.


Next work session the tank is fitted to the spar, and the right wing assumes it's final form.

Sunday, January 18, 2009

3.2 hrs, 247 rivets
Started this morning by working on the wing cradle. Charged 2 hrs to miscellaneous.

Then the daughter was ready to help. We riveted the inboard top skin to the left wing. Worked out very nicely.


Short post, lot's of progress.


Saturday, January 17, 2009

.5 hrs
Cold in the morning, but turned out to be a nice day in the afternoon.
Match drilled stiffeners to the right tank skins. But had to stop. All clecos in use, and need
about 50 to continue with the tank. Dang. Need to get the left wing riveted to free up some clecos.


Decided to spend time instead on a few misc. items that had accumulated. First, spent about 3 hours assembling some wren houses. Now maybe we can produce wrens faster than that cat can eat them. Also the old ones were a little too easy picking for the blue jays. The new ones are deeper, so the jays can't stick their heads far enough in.


Then spent about 2 hrs charge to misc assembling the wing cart. Using scrap, so it's a design challenge. Stopped because it got dark, but also used up the screws needed to continue.

Friday, January 16, 2009

2.5 hrs
Clecoed ribs to the right tank skin.
Katrin helped me get the first two clecoes in on all the ribs.

This is a difficult and painful task and requires two people, one aft of the skin for the brute force rib placement, and the other forward to place the clecoes. Placing the ribs requires two hands under a lot a strain, a second pair is needed for clecoing.
The process that seems to work best (for me) is:


  1. Mark crosshairs on the ribs at the two forward most top rivet holes. This provides targets in the heat of battle.
  2. Set the skin bottom side down on the table.
  3. Cleco a rib to the bottom skin with just the two forward most holes.
  4. Start pushing the rib/pulling the skin. Using a small diameter punch get the 2nd or 3rd top hole lined up.
  5. Push/pull harder until the rib is all the way seated. The punch is worked to pull the rib into alignment as the rib is worked back. Be careful with the small diameter punch or it will break (start the process with two!). A safety pin might also come in handy when there's just a sliver of overlap.
  6. While holding it in place, get the two front clecos inserted.
  7. Relax, curse, shake hands and shoulders out.


Repeat for the other six ribs.

Then finished putting in the rest of the clecos. Had to scavenge some from the wing in progress.


Thursday, January 15, 2009

2.2 hrs
Put the outboard skin on the left wing to double check the beveling of the skins where they overlap. It was flush with the tank skin as specified, so took off both skins and gave 'em a shot of primer where the aluminium was filed off.

While the primer was drying, took the tank back off the spar. I was unhappy with the dimples done the day before. Ignored the advice to not use a squeezer, and the result was horrible dimples. Decided to try the DRDT-2 to press them out. Put the #8 dimple dies on, with a spacer under one (so that I didn't have to change the setting for the #40 dimples). Pressed a couple of holes. What a difference. It got rid of most of the puckering. Did one whole side, then decided to add another spacer on the other die. Viola! It took virtually every bit of pucker out. Now the dimples are set in nice flat skin. So repressed all the holes. Ended up dimpling the tank screw holes 3 times! I guess with a C-frame dimpler as mentioned in the narrative you can just whack the hell out it to get enough force. Couldn't reach the most forward bottom hole (outboard end) with the press, so tried to hit it again with the squeezer. You really have to put a lot of effort in to the tank skin, like enough to squeeze a 1/8 rivet. A squeezer is not recommended.


Before and after are quite obvious.

Installed the tank a second time, and then the inboard skin and doubler. This time put in all the necessary clecos.


Also removed the vinyl from the inside of the right tank skin. Numbered the right tank ribs to prepare to cleco them into the skin. Marked the two inboard ribs for a fuel injection return line.

Wednesday, January 14, 2009

2.0 hrs
Trial fit of all screws and bolts for left tank attach.
Fit tank and install half of screws and bolts.

Final check of left wing twist, less than a 16th.
Start clecoing top inboard skin and doubler to left wing for final riveting.

Decided to stop before installing too many rivets. I want to double check the inboard/outboard overlap. And I need to prime them before installation.


Tuesday, January 13, 2009

2.9 hrs, 122 rivets
Finished riveting the leading edge ribs to the spar with Katrin's help again. Some of those rivets feel kind of ugly, but they'll hold.


Then riveted the leading edge skin to the spar. The skin snugs down into those spar countersinks nice and snug. There's no gap at all between the spar and the skin. Just one rivet left as described yesterday.


Also dimpled the left tank skin #8 screw holes. Started setting it on the rib, but decided it would be better to fit every screw for every nutplate with the tank off first. Using Boelube on the bolt and screws for the first run through the nutplate. After those are all in, they'll come out easily with a cordless driver, and then the tank can go on.


Monday, January 12, 2009

2.5 hrs, 29 rivets
Started by leveling the left spar, and then clecoing the leading edge on for the last time!

The daughter was home, so cooped her to shoot rivets. I bucked, she ran the rivet gun. We had to drill out the first one because I wasn't holding the bucking bar right and it immediately bent over. Actually I was trying to use a piece of compression foam with a hole in it to press the spar flange down while the bucking bar is against the rivet. It just didn't work. After 15 minutes drilling that out, shot it again, this time perfectly.

Had to drill out one more that we didn't even buck. It wasn't going in, so we gave it a couple of light taps to seat it. That really screwed it up. Took 20 minutes to drill out this one, since it was only a millimeter in the hole. Couldn't pull it out, but had to drill it into oblivion. Didn't mess up the spar or flange too bad, and the replacement went in fine.

Got 5 of the ribs done, two more plus one corner rivet to go. That last rivet has to wait until it's off the stand and the mounting angle is removed.

Sunday, January 11, 2009

5.2 hrs, 17 rivets
Finished duckworks bracket install for left wing.

After reading the paper and having breakfast, ran a quick trip to Home and Aircraft Depot. Picked up birdseed (for the finch flock), 8 foot cedar boards for new wren houses, and flat black paint. The paint was for the newly constructed light mounting bracket. Decided to paint it flat black. Entirely optional. Thinking of leaving everything else in that bay untouched. I think it's going to look great.
Riveted the now flat black bracket together. Also match drilled, primed, and painted the right bracket.


Countersink the acrylic window. Used the deburring bit. This makes hexagonal holes, no matter how hard you try to keep it steady.
Final drill and countersink the #6 screw holes in the skin. This step and the countersinking in the previous step - which required a test dimple in .025 skin material, recycled from the light cutout - took a fair amount of time step drilling and using reamers to try and get round holes. Going from a #40 hole to a #6 screw, I would drill a couple of intermediate sizes using the bits in the new #1-#60 kit I bought from Brown Tool. This collection of drill bits is not found in any of the RV tool kits, but I constantly found a need for some odd sized bit. Now I have them all. What a great toy. My grandfather would be proud.

Countersink retainer clips and rivet nutplates to retainer clips.
Install weather stripping.
Trimed the acrylic window to size on the bandsaw and finished using the process on the Duckworks FAQ page.


Installed the bracket and the window. I may need to remove the window for storage, since it will be 2 and half more years before it will be airborne.


After the light kit detour, it was time to get back to wing construction. The next order of business was match drilling the right leading edge.


Next up is the right tank, but in parallel the left wing can be final riveted, starting with the leading edge.

Saturday, January 10, 2009

5.8 hours, 8 rivets
The Duckworks light brackets arrived yesterday, so today it was time to intall the left bracket.


The instructions say it can be done in 4 hrs, but I guess I'm just slow. Still 1 or 2 hours left on the left kit.

The process goes like this:
Cut and finish hole in leading edge skin.


Drill pilots for leading edge window mounting screws.
Mark ribs for mounting screws, drill, and install nutplates. Didn't like the pop rivets supplied with the kit. They were not tight at all, so drilled 'em out and used -3 rivets. The pop rivets would have been fine, but they were too loose, and I could afford to spend the time on tighter rivets.
Cut the supplied bracket, which is too long for the 9 rib spacing, to length. I did both brackets. Dimpled and primed the left bracket.
Chose to prime just the left bracket right now, and I'll paint it flat black.
Drill skin and window to #40, then #30.

Thursday, January 8, 2009

2.1 hrs
Deburred the right bottom inboard wing skin, and peeled the plastic from the inside. Now it gets put up for a while. Still need to bevel the overlapping leading edge of these skins.
Then fit and clecoed the leading edge assembly to the right wing frame. It fit fairly well, getting a bit tough to get the outboard holes to line up on the spar. But it went on, and matches the leading edge skin pretty darned good.

Next came the inboard leading edge rib and tank attach strip fitting. This seemed easier on the left wing, but it went in OK. I think I did a better job of pre-bending the strip to shape before fitting.

Wednesday, January 7, 2009

1.5 hrs
Removed bottom skins from right wing. Deburred the outboard skin. Slowly but surely.

Tuesday, January 6, 2009

2.0 hrs
Match drilled the right wing bottom skins. Next up is taking them back off and deburring, and then match drilling the leading edge. Then it's on to the right tank. The right wing is going much faster than the left, since I did most of the prep work when doing the left wing.


Sunday, January 4, 2009

4.8 hrs
Major progress on the right wing. Finished match drilling the top skins, including the stringers.

Moved on to the bottom skins. Discovered that once again, had not left enough room for the bottom skin to clear the support arm. So took the wing off the stand and reinstalled allowing enough for the outboard edge of the bottom skin to clear. It sticks out a half inch for the extra material required to attach the wing tips. Katrin helped me with this and with initial installation of the bottom skins.


After correcting for that mistake, clecoed the bottom skins to the right wing frame. It's amazing how strong the wing gets with both skins in place. Tomorrow is more match drilling, then right leading edge install.

Mailed the order for two Duckworks install kits on Saturday. When they get in, I'll resume work on the left wing.

Saturday, January 3, 2009

3.5 hrs
As usual for me, got the top skins almost completely clecoed on, then decided I wasn't happy with the jig alignment. So removed the wing skins and refined the wing frame alignment on the stand. This time carefully clamped it in place. After that, then reinstalled the wing skins. My hands are sore from all those clecos. Using a cleco in every third hole, even though the instructions call for every fourth hole.

Next, started match drilling skins. Got mostly done, except for the rear spar and wing walk doubler.

Had a rare appearance by Katrin, who helped align the stringers to the skin from behind. This is way easier with two people.
Marked the stringers at the actual center line as learned on the left wing. But also marked 3/16 from the edge as per the instructions. Started match drilling the stringers, with Katrin holding them flush and centered in the gap between the rib flanges. This time the holes fell neatly right between the two lines, or closer to the inboard end, dead center on the line I marked as the center (about 1/4 inch from the unbent edge). Using the measurement as given in the instructions will not allow the stringer to set flush to the skin, and that was consistent on both wings. For the right wing, got the correct lateral position on the outboard stringer, which was off by a bit on the left wing due to some confusion over the wording in the instructions.

Friday, January 2, 2009

4.9 hrs
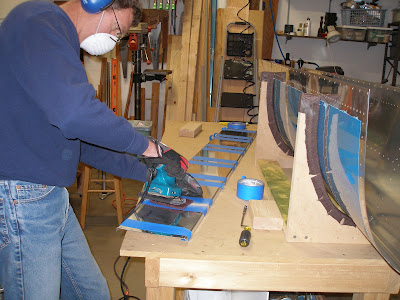
Need to order the Duckworks light install brackets. Since work is on hold for the left wing, began edge deburring right leading edge and tank skins.
Then Jim Darrah came over to spend the afternoon with me. We started by trimming the right leading edge rib #3 to clear rivets on the main spar. Then clecoed the right leading edge together. It turned out much nicer than the left leading edge. As many other builders have noted, the second side will be much better than the first. This makes me feel better, because all those other planes fly perfectly well.

Jim Darrah, Best Man!


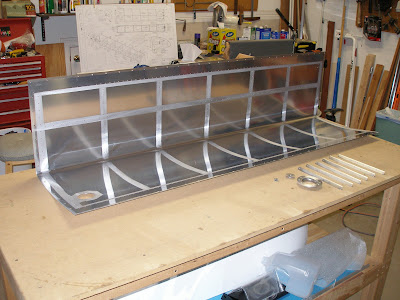
Next we clecoed main ribs to right spar, and then attached the rear spar.


The frame was placed on the wing stand and leveled. A first measure for twist showed it to be perfect, less than a 64th.

We did the prelim drill of the wing walk doubler to inboard skin, and then clecoed the doubler and inboard skin to frame. Called it quits after that and had a nice dinner, complements to Lynne.